
Supplies
- FloraCraft® CraftFōM®:
- (1) 15/16" x 11 15/16" x 17 15/16" Block - White
- (2) 8 oz Smooth Finish
- Acrylic Paint:
- Zinc
- Gray Sky
- Victorian Blue
- True Ochre
- Hauser Medium Green
- Warm White
- Plastic Flatware: Knife, Fork, and Spoon - Silver
- Sample Piece of Wood - (To Copy Grain)
Tools
- (12) Toothpicks
- (3) Large Paper Clips
- 1/2" Wide Flat Paintbrush
- Palette or Paper Plate
- Paper Towels
- Water Container
- Mechanical Pencil
- Hot Glue Gun and Glue Sticks
- Serrated Knife
- Ruler
- Cutting Mat or Stack of Newspapers
Instructions
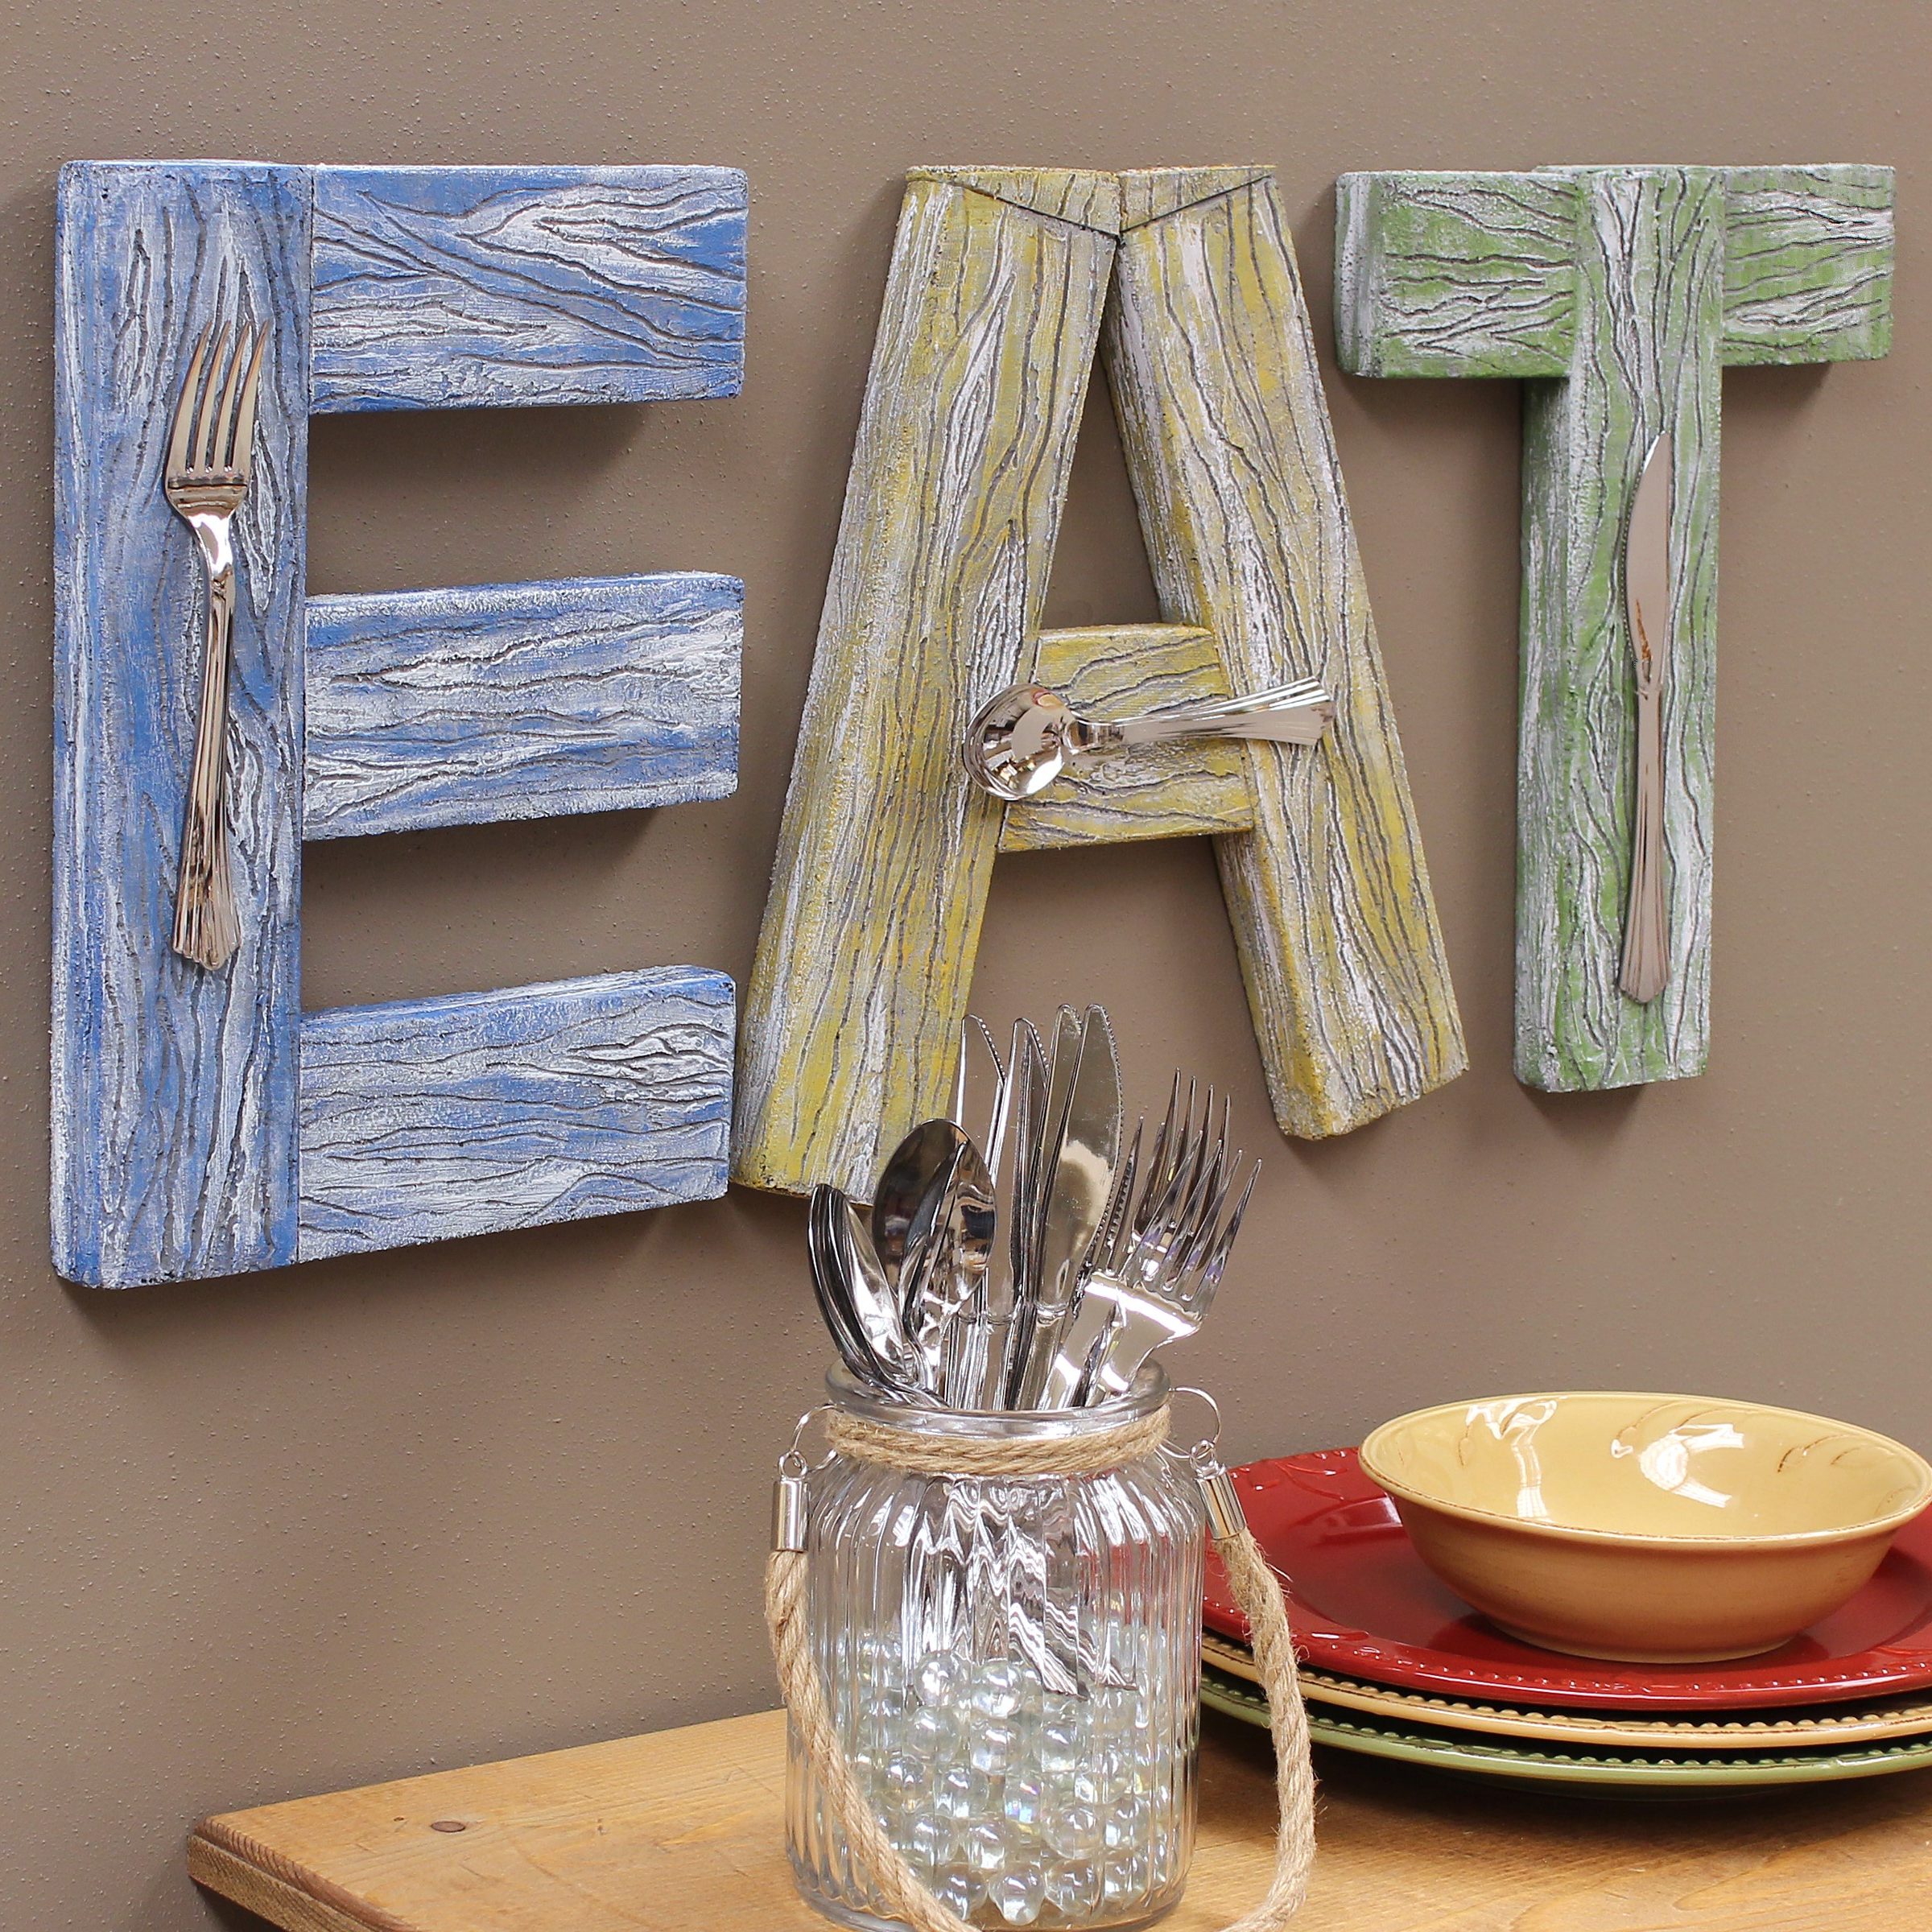
1. On cutting mat, horizontally place foam block. Measure and mark every 2 1/2″ for a total of seven strips (11 15/16″ long). Use a serrated knife to cut along pencil lines, scoring lightly first and then pressing deeper with each knife’s pass.
2. Use a table knife to apply Smooth Finish to one strip, going lengthwise (the way wood grain would go.) Press Smooth Finish into foam crevices but still allow it to ripple and create texture and leave some on the surface. Apply it to the top, sides, and ends.
3. Retract the lead of the mechanical pencil. Use it to draw lines in the Smooth Finish, copying a sample piece of wood. (Note: If you don’t like the lines, smooth over them with a knife and draw again.) Repeat the process with all foam panels. Let dry.
4. Paint all but the backs of the strips with Zinc, making sure the paint goes down into the lines. Let dry.
5. On the palette, squeeze Sky Gray. To dry the brush, keep the brush totally dry and parallel to the surface. Lightly drag the bristles over the surface to leave broken areas of paint that do not go down into the inscribed lines at all. Repeat on all painted sides of the strips.
6. Before continuing with painting, build the letters. For the “E,” place one strip vertically. Use the serrated knife to cut two more strips in half. Set one half-strip aside for now. Align the other three against the vertical strip for the crossbars. Break-in half three toothpicks. To connect, insert two pieces into each crossbar’s cut ends and press them into the vertical strip. One at a time, remove a crossbar, apply hot glue to the cut edge and re-insert it into the toothpick holes. Press firmly until set.
7. Skip to the “T.” With the remaining half-strip, cut that in half and use toothpicks to attach to either side of a vertical strip. (Note: You’ll need to paint one cut end with Zinc, let dry and dry brush Sky Gray on it. It won’t have Smooth Finish on it but will not be noticeable.)
8. For the “A,” set two strips at angles, with tops just touching and bottoms 6″ apart. From the last strip, cut a 4″ crossbar piece. Set it on top of the A strips (about 4″ up from the bottom). Use a pencil to sketch the angles to cut the crossbar. Trim along pencil lines and save the scraps. To assemble, use toothpicks and glue. Optional: At the top, position the scraps to create a straight top on the “A.” Paint foam edges as you did with the “T” crossbar.
9. Just as you dry brushed the Sky Gray, similarly dry brush each color on the letters: Victorian Blue “E”; True Ochre “A” and Hauser Medium Green “T.”
10. Mix Warm white with Sky Gray (half and half). To create lighter areas, dry brush the mixture onto some areas of the design on each strip, including the edges and ends. Let dry.
11. Position plastic fork, spoon, and knife on the letters as shown. Glue contact points with a glue gun.
12. With each letter, hold it up between thumb and forefinger to determine the balance point and mark on the back in pencil. (For the “A,” make a mark on the middle of the crossbar.) To make a hanger, slightly separate ends of a large paper clip, approx. 1/4″. At the balance point on the back of each one, insert the shorter end of the paper clip into the foam, creating a hanger loop with the longer end. (Keep it low enough that it doesn’t show from the front.) Hot glue to secure
-
 Celebratory Candy CakeSkill level: Beginner
 -
 Teacher Gift MugSkill level: Beginner
 -
 Bubbling Pumpkin CauldronSkill level: Beginner
 -
 Custom Charcuterie DisplaySkill level: Beginner
 -
 St. Patrick’s Day DecorSkill level: Beginner
 -
 Butterfly Pixel Wall ArtSkill level: Beginner
 -
 Fruit Appetizer TreesSkill level: Beginner
 -
 Easter Egg Table DécorSkill level: Beginner
 -
 Shamrock Porch DécorSkill level: Beginner
 -
 Eyeballs Everywhere WreathSkill level: Beginner
 -
 Narwhal Wall ArtSkill level: Beginner
 -
 Painted Cactus Wall ArtSkill level: Beginner
 Subscribe


