
Supplies
- FloraCraft® CraftFōM®:
- Blocks:
- 1 15/16" x 11 7/8" x 17 7/8" - White
- 1 1/4" x 5" x 12" - White
- Blocks:
- Sweater Sleeves:
- (2) or each Color - 3-5 Coordinating Sweaters
- Heavy Cardboard:
- 5" x 7"
- 12" x 18"
Tools
- Foam Cutter
- Floral Shears
- Metal Ruler
- Pencil
- Permanent Marker
- Toothpicks
- Large Paper Clip
- Glue Gun and Glue Sticks
Instructions
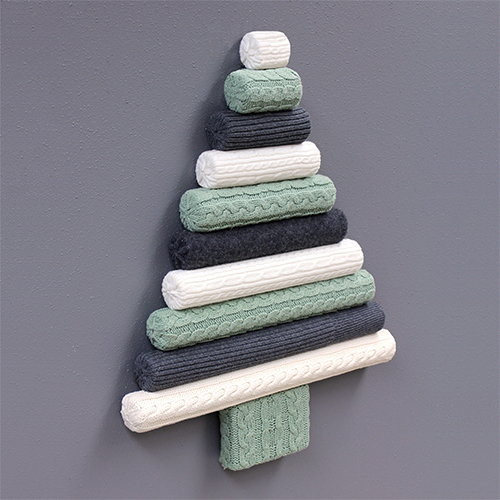
- Measure and draw with marker lines to divide a large Foam Block into six 2″ x 18″ long strips. (The last strip will be slightly narrower, but that’s okay.) Use a metal ruler and Foam Cutter to cut strips. Also, cut a smaller Foam Block to 4″ x 6″ and set it aside for now.
- Measure, mark and then cut Foam strips to the following lengths: 20″, 18″, 16″, 14″, 12″, 10″, 8″, 6″, 4″, and 2″. (Tip: For the 20″ length, cut 2″ off the next strip to add to it. That also creates the 16″ length. Similarly, cutting the 14″ length creates the 6″ length; 12″ creates 4″ and 2″ lengths (discarding the other 2″ length); and last, 10″ length creates an 8″ length.)
- Optional: Leave Foam angular and skip to Step 4. However, if you want Foam to be rounded, as in the photo, create cylinders (rods) from Foam by trimming off corners as follows: Set one shorter length on the end and use Foam Cutter to slice off each corner, making the block 8-sided vertically. Then trim off each of those “corners” to round it more. You can smooth rods by rubbing them with another piece of Foam (however, they do not have to be completely smooth since sweater sleeves are thick.) Repeat with other lengths. (Note: Longer ones can be left horizontally on the table and trimmed.) Make rods of all Foam lengths.Lay rods on the table in tree formation, going from shortest at the top to longest at the bottom. For the bottom 20″ rod, hot glue the end of the 2″ rod onto the 18″ rod. Plan sweater sleeve colors to be used on each rod, creating a pattern in how they are repeated.
- Use Floral Shears to cut close to seams of sweaters to create flat pieces. (Note: Keep pieces running horizontally so that cable stitching runs with the length.) Then trim pieces to 6″ from top to bottom (which will wrap around the rod.) After being certain of where each color sweater piece will go on the tree, cut them to correct lengths by taking the length of the rod and adding 2″ for wrapping ends. Save 8″ x 10″ sweater piece for the base of the tree. (Can be cut from the main part of the sweater.)
- To wrap, center rod on sweater piece and glue along one long edge. Wrap and glue other long edge butted against first (not overlapped). Apply glue to one end, and press sweater ends into the glue. Repeat on the other end.
- To cover the bottom of the tree, center 4″ x 6″ Foam onto an 8″ x 10″ sweater piece. Pull over sides and glue ends onto the back, working on alternating opposite sides to evenly (lightly) stretch. (Note: entire back won’t be covered.)
- Use a pencil and ruler on a 12″ x 18″ vertical piece of cardboard to draw a triangle with sides going from both bottom corners up to the top center. Cut out. Also, have 5″ x 7″ piece cardboard ready.
- Set each covered rod onto cardboard with seam side against cardboard. Also, horizontally set 4″ x 6″ covered Foam base at the bottom center of rods and slide vertical 5″ x 7″ underneath so that it overlaps the cardboard triangle. Remove just the bottom rods and glue together overlapped cardboard pieces. Replace rods, making sure no cardboard shows. Glue each rod to cardboard, working from the top down and gluing the base last.
- To make hanger loop from paper clip, slightly separate curved ends of paper clip 1/4″. On top of the tree cardboard, hot glue a shorter, rounded end of a paper clip to the cardboard, creating a hanger loop with a longer end. (If desired, cover the glued area with a scrap of paper.) Let dry completely before hanging.
-
 Celebratory Candy CakeSkill level: Beginner
 -
 Teacher Gift MugSkill level: Beginner
 -
 Bubbling Pumpkin CauldronSkill level: Beginner
 -
 Custom Charcuterie DisplaySkill level: Beginner
 -
 St. Patrick’s Day DecorSkill level: Beginner
 -
 Butterfly Pixel Wall ArtSkill level: Beginner
 -
 Fruit Appetizer TreesSkill level: Beginner
 -
 Easter Egg Table DécorSkill level: Beginner
 -
 Shamrock Porch DécorSkill level: Beginner
 -
 Eyeballs Everywhere WreathSkill level: Beginner
 -
 Narwhal Wall ArtSkill level: Beginner
 -
 Painted Cactus Wall ArtSkill level: Beginner
 Subscribe


