
Supplies
- FloraCraft® CraftFōM®:
- (2) 3" Balls - White Balls
- A scrap of FōM (To hold painted balls while drying)
- Diamond Dust
- 12" x 12" Cardstock - White
- Acrylic Paint:
- Pink
- Orange
- Yellow
- Paper Straws:
- (1) Pink
- (1) Orange
- (1) Yellow
- Plastic Coated Paper Clips:
- (1) Pink
- (1) Orange
- (1) Yellow
- 12" Baker's Twine:
- (1) Pink
- (1) Orange
- (1) Yellow
Tools
- Medium Paintbrush
- Three Craft Sticks
- Pencil
- Serrated Knife
- Scissors
- Wire Cutter
- Container of Water
- Plastic Spoon
- (4) Paper Plates
- Masking Tape
- Paper Towels
- Paper Bag
- Large Cardboard Box (For Spraying)
- Old Newspapers
- Spray Adhesive
- Glue Gun & Glue Sticks
- Click Here For Template: SNOW CONE
Instructions
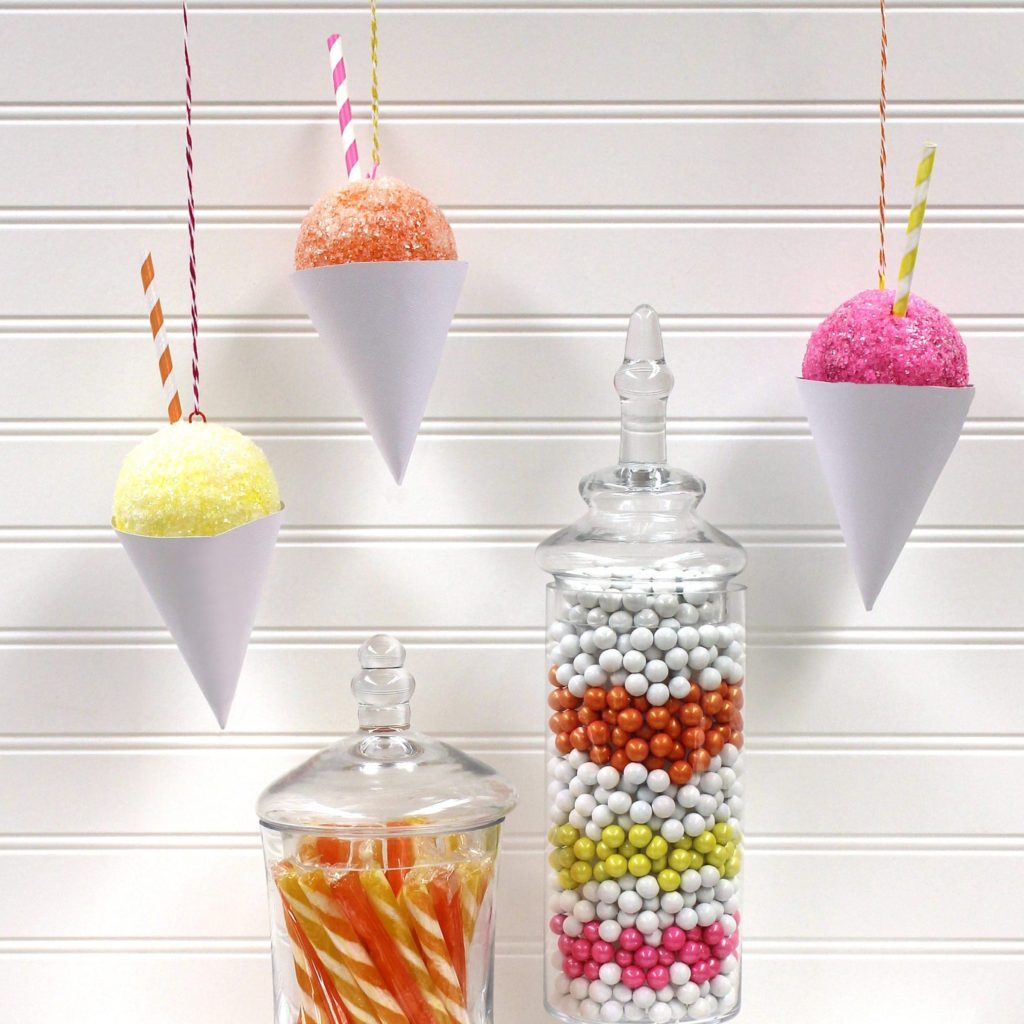
- Insert a craft stick into the bottom of one foam ball. Squeeze pink paint onto a paper plate and paint. Insert the other end of the craft stick into a scrap foam to let the foam ball dry. Repeat with orange and yellow color on other foam balls and let dry. (Leave craft sticks in foam balls.)
- Insert single-loop ends of paper clips down into the tops of foam balls, directly opposite craft sticks. Allow 1/4″ of top loops to show. (Vary colors of foam balls and paper clips as desired.) To prevent loops from getting sticky in Step 3, use a small piece of masking tape to cover each loop. Insert a pencil at the vertical angle you’ll want the straw to be and remove it, so there is a place for the straw to be added later. Repeat with the other two foam balls.
- Set the last paper plate on the table and pour diamond dust onto it – about 1/2″ thick. Set a plastic spoon beside the plate. In a well-ventilated, newspaper-covered area (inside box), spray one ball with adhesive. (Hold foam ball by craft stick.) Immediately, roll the foam ball into diamond dust on a plate, generously coating it all over. Use a plastic spoon to scoop up diamond dust to pour onto any sparse areas, avoiding going down into the straw hole. Set back into scrap foam to dry. Repeat with other foam balls. Pour diamond dust back into the container, bending the plate as needed. Thoroughly clean work area.
- Use a pencil to trace the cone pattern onto cardstock three times. Use scissors to cut out. Roll into cones and hot glue tabs to the insides of cones.
- When foam balls are thoroughly dry, remove them from scrap foam. Remove the masking tape from loops. Carefully hold one foam ball and place the craft stick down into the paper cone to see how much of the stick needs trimming to fit so that foam ball is nestled into the cone’s rim. Working inside a paper bag to catch any flying pieces, cut that amount from the end of the craft stick using a wire cutter. (Hint: Trim just a little at a time and keep checking – The cut end of the craft stick can be tapered as needed to fit into the point of the cone.) When the fit is right, apply a large dot of hot glue to the end of the craft stick and insert it into the point of the cone. (This is all that is needed to hold the cone.)
- Insert straw into holes in foam balls. Then, use scissors to trim to 3″. Hot glue if loose.
- Insert chosen color baker’s twine into paper clip loops, make overhand knots and hang.
- Note: Snow cones are for decoration only. Keep diamond dust out of reach of children.
-
 Celebratory Candy CakeSkill level: Beginner
 -
 Teacher Gift MugSkill level: Beginner
 -
 Bubbling Pumpkin CauldronSkill level: Beginner
 -
 Custom Charcuterie DisplaySkill level: Beginner
 -
 St. Patrick’s Day DecorSkill level: Beginner
 -
 Butterfly Pixel Wall ArtSkill level: Beginner
 -
 Fruit Appetizer TreesSkill level: Beginner
 -
 Easter Egg Table DécorSkill level: Beginner
 -
 Shamrock Porch DécorSkill level: Beginner
 -
 Eyeballs Everywhere WreathSkill level: Beginner
 -
 Narwhal Wall ArtSkill level: Beginner
 -
 Painted Cactus Wall ArtSkill level: Beginner
 Subscribe


