
Supplies
- FloraCraft® CraftFōM:
- (1) 3 7/8" x 5 7/8" Egg - White
- Spray Glitter - Silver
- Spray Color - Gray Flannel
- Toothpicks, round style, approx.150
- (3) 14mm Beads - Black
- 4" Square Felt - Pink
Tools
- Ruler
- Paper Grocery Bag
- Large Cardboard Box (For Spraying)
- Old Newspapers
- Tacky Glue
- Floral Shears
- Serrated Knife
Instructions
- Placing Foam Egg horizontally, use a serrated knife to trim 2 1/2″ diameter off the bottom so that it doesn’t roll on the table. Then on the short end, carve a dip in the top about an inch from the end, to create his snout. Also carve out both sides in the cheek area, next to his snout so that it smoothly tapers, being careful not to trim the snout area itself – leave that as the end of the egg. Where his mouth would be, about 1 1/2″ from the end of the snout, use a knife to draw the curved mouth. If desired, also add short curved lines to underline cheeks. Carefully carve mouth about 1/4″ deep. Hint: Hold it from all angles to be sure you’re getting the shape the way you want it from front and sides.
- Eyes should go about 1″ back from the end of the snout and 1/2″ apart. Press beads into those areas, remove and use the round end of the “Tuck” Foam Tool to press foam in so that beads are recessed into the head. Try beads again and then remove them and set them with nose bead for now. (Wait to glue.)
- Use floral shears to cut (or snap apart) five toothpicks in half. (For safety, if cutting, work inside a paper bag to catch flying pieces.) Insert cut ends of ten pieces, in a half-circle, 1/2″ apart, close to eyes (like 1/2″ long bangs that are sticking straight out and slightly forward). Cut in half five more toothpicks (total 10 pieces) and similarly arrange the next row, 1/4″ back from the first row, and staggered so that they don’t line up. Press these in a little less far and angled upright. Note: See photo. Each row of toothpicks from now on should angle farther back on his back than the previous row until the ones at the back angle down. (Think of how the hair on an animal grows.)
- For remaining rows, instead of cutting the toothpick in half, trim off and discard about 1/3. Insert trimmed toothpicks so that about 1 1/2″ extend out and toothpicks are evenly spaced but staggered. Continue inserting them, row-by-row. The toothpicks along the bottom will just touch the table, but not go underneath onto a flat surface. If any toothpicks are loose, remove them, dot them with tacky glue, and re-insert them into the foam.
- In a well-ventilated, newspaper-covered area (inside cardboard box) lightly spray the entire hedgehog two coats of gray flannel. Let dry.
- Glue two beads into eye openings. Apply glue to the pointed end of half a toothpick and insert into the hole in nose bead. Apply glue to the cut end of a toothpick and insert it into the snout.
- In the same spraying area, lightly spray hedgehog with two coats of spray glitter, also covering beads. Let dry.
- For ears, cut two 1 1/4″ long simple leaf shapes from pink felt. (Optional: Apply a thin line of glue up the middle of each felt ear and fold in half along the glue line. When dry, open to see that the glued fold now creates ears that curve in on the sides, like animal ears.) Plan where to put ears, among third-row toothpicks. Use knife tool to make 1/4″ long cuts, apply glue, and insert ears into cuts.
- For the mouth, cut approx. 1/8″ x 3″ long strip felt that is pointed on each end. Carefully, check fit in the mouth and trim length as needed. Apply a thin line of glue inside the mouth area and press the felt strip into it. (Use a toothpick to help press in place.) Repeat the process with two cheek lines using 1″ long strips.
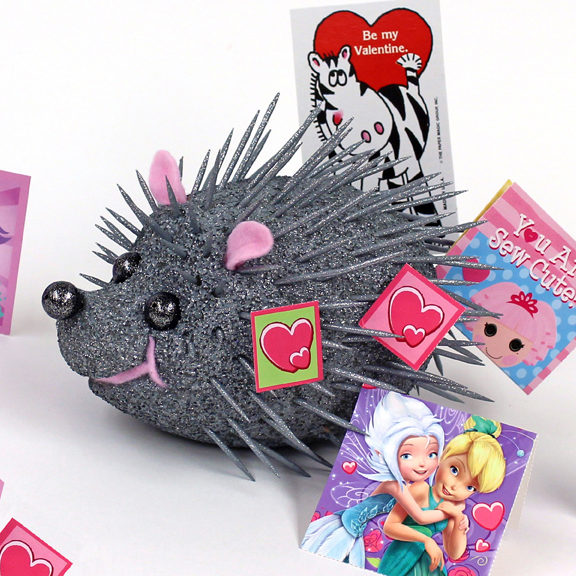
- 7. Set valentines among toothpick quills, and all around him for a valentine display. If desired, use a hole punch in valentines and hang some from quills.
-
 Celebratory Candy CakeSkill level: Beginner
 -
 Teacher Gift MugSkill level: Beginner
 -
 Bubbling Pumpkin CauldronSkill level: Beginner
 -
 Custom Charcuterie DisplaySkill level: Beginner
 -
 St. Patrick’s Day DecorSkill level: Beginner
 -
 Butterfly Pixel Wall ArtSkill level: Beginner
 -
 Fruit Appetizer TreesSkill level: Beginner
 -
 Easter Egg Table DécorSkill level: Beginner
 -
 Shamrock Porch DécorSkill level: Beginner
 -
 Eyeballs Everywhere WreathSkill level: Beginner
 -
 Narwhal Wall ArtSkill level: Beginner
 -
 Painted Cactus Wall ArtSkill level: Beginner
 Subscribe


