
Supplies
- Large Tree
- FloraCraft® CraftFōM®:
- Balls:
- (2) 1” - White
- (2) 1.25” - White
- (2) 1.5” - White
- (2) 2” - White
- (2) 2.5” - White
- (2) 3" - White
- (2) 4” - White
- 1”x6” Disc - White
- Balls:
- Medium Tree
- FloraCraft® CraftFōM®:
- Balls:
- (2) 1” - White
- (2) 1.5” - White
- (2) 2” - White
- 3” - White
- 1”x4” Disc - White
- Balls:
- Small Tree
- FloraCraft® CraftFōM®:
- Balls
- (4) 1” - White
- (3) 1.5” - White
- (2) 2” - White
- 1”x4” Disc - White
- Balls
- Large Spider
- FloraCraft® CraftFōM®:
- Balls:
- 1.5" - White
- 2” - White
- Balls:
- Small Spider
- FloraCraft® CraftFōM®:
- Balls:
- 1" - White
- 1.5” - White
- Balls:
- Acrylic Paint:
- Purple
- Silver
- Black
- Glitter:
- Purple
- Silver
- Black
- Chenille Stems - Black
- Yarn – Coordinating Color
Tools
- Low-Temp Glue Gun
- Foam Cutter or Serrated Knife
- Wire Cutters
- Paint Brushes
- Toothpicks
Instructions
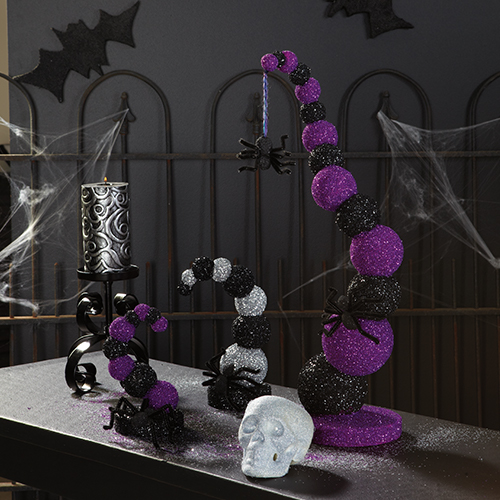
- Arrange the balls for each tree into a twisting configuration on the table. Start with the largest balls at the bottom up to the smallest balls at the top. Where the balls meet, use firm pressure to push and twist the two pieces together. This will create a flat space on each ball where you can glue them together. Use a toothpick between the two pieces for added support. Cut a flat spot on the bottom of each tree and glue the trees to the discs.
- Paint the balls, alternating between two colors; black and purple or black and silver. Paint all the black parts first. While each part is still wet sprinkle with glitter. The glitter will stick to the wet paint so you don’t have to glue the glitter on later. Let all parts dry completely.
- Large spider; cut the 2” ball in half and use one half for the body. Cut the 1.5” ball in half and use half for the head. Use the remaining two half balls to create another spider or save for future project. Shape the head and body into an oval shape by pressing on the edges of the balls with your fingers. Glue the head to the body and paint the spider black. Let dry. Fold four chenille stems in half to create the eight legs. Glue the folded end of two stems on each side of the spider just behind the neck. Cut two ½” pieces of stem and glue into the face for pinchers. The small spiders are made the same as the large spider. Use half of a 1.5” ball for the body and a half 1” ball for the head. Shape the heads and bodies, paint black and let dry. Fold four 6” stems in half to create the eight legs. Glue four legs on each side just behind the neck. Glue in ½” pieces of stem for pinchers.
- Glue a piece of yarn to the back of a small spider and hang from the large tree. Glue the other spiders climbing the trees.
-
 Celebratory Candy CakeSkill level: Beginner
 -
 Teacher Gift MugSkill level: Beginner
 -
 Bubbling Pumpkin CauldronSkill level: Beginner
 -
 Custom Charcuterie DisplaySkill level: Beginner
 -
 St. Patrick’s Day DecorSkill level: Beginner
 -
 Butterfly Pixel Wall ArtSkill level: Beginner
 -
 Fruit Appetizer TreesSkill level: Beginner
 -
 Easter Egg Table DécorSkill level: Beginner
 -
 Shamrock Porch DécorSkill level: Beginner
 -
 Eyeballs Everywhere WreathSkill level: Beginner
 -
 Narwhal Wall ArtSkill level: Beginner
 -
 Painted Cactus Wall ArtSkill level: Beginner
 Subscribe


