
Supplies
- FloraCraft® CraftFōM®:
- Balls:
- 6" - White
- 8" - White
- 10" - White
- Balls:
- 2 1/2" x 5.5 yds. Wired Burlap Ribbon - Cream
- 5" x 4.5 yds. Burlap Garland - Natural
- 5" x 1.5 yds. Burlap Garland - Natural with Black Chevron
- Sticks:
- 1" x 4"
- 1.5" x 4"
- 2" x 4"
Tools
- Foam Cutter
- Floral Shears
- Hand Saw
- Glue Gun and Glue Sticks
Instructions
- Use foam cutter to remove approx—5 1/2″ diameter circle off top and bottom of 10″ ball. On top, scoop out area, going about 2″ deep. Use foam cutter to smooth any edges so that foam goes smoothly from outside into bowl-like area. Inside the center of bowl area, carve out a 1″ diameter, 1″ deep hole (for stem).
- Similarly, use a foam cutter to remove approx—4 1/2″ diameter circle off top and bottom of 8″ ball. On top, scoop out area and make 1″ hole. Last, use foam cutter to remove approx. 3 1/2″ diameter circle off top and bottom of 6″ ball, scooping and making 1″ hole.
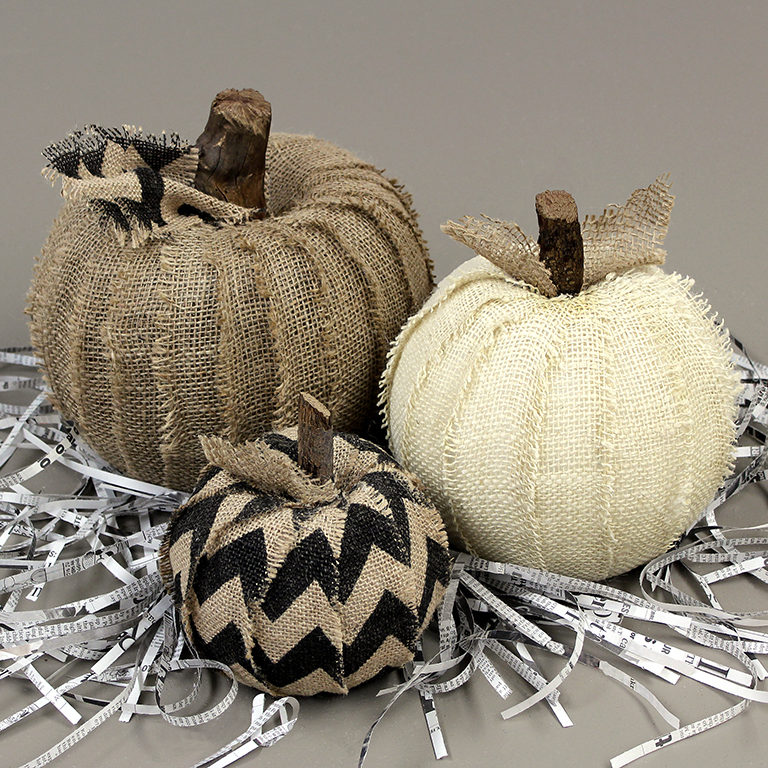
- For 10″ ball, cut ten 15″ lengths of 5″ wide burlap garland. Then cut those in half lengthwise, resulting in twenty 2 1/2″ lengths. On each length, gently pull off two – three strings along one long side in order to fray burlap about 1/4″.
- Notice in the photo that burlap lengths have one frayed edge that shows while the next length covers the other unfrayed edge. Consider which direction you want to go to make that overlap, and practice with a couple of sizes before gluing. To wrap a 10″ ball, apply hot glue to one end of one burlap length and glue to the top center, just outside a 1″ hole. Wrap length around to bottom and glue at bottom center. (Note: Pull length so that it doesn’t gap, but not too tightly, so that frayed edge will still ruffle. Similarly, attach the next length, overlapping most of the first length at the top, but only about 1/2″ of that length at the side, then back to overlapping most of it again at the bottom center. Repeat each length, working your way around until you reach the beginning again. Before adding the last length, tuck it under the first length so that the overlapping pattern is consistent.
- For an 8″ ball, cut fourteen 13″ lengths of 2 1/2″ wide cream wired burlap ribbon. Cut off both wire edges but fray one long edge on all lengths. Follow Step 4 directions to wrap the 8″ ball.
- For a 6″ ball, cut five 9″ lengths of 5″ wide chevron print burlap. Then cut those in half lengthwise, resulting in ten 2 1/2″ lengths. Follow Step 4 directions to wrap a 6″ ball, matching chevron zig zag as much as possible.
- For stems, trim sticks to desired lengths and insert them into 1″ holes in the foam. (Note: glue cut end and leave top end as natural as possible.) Hot glue to hold. For leaves, cut 2″ – 3″ squares of extra burlap, fray, scrunch and glue points into pumpkins as desired.
- To display, use a paper shredder to shred black & white newspaper and place it all around pumpkins.
-
 Celebratory Candy CakeSkill level: Beginner
 -
 Teacher Gift MugSkill level: Beginner
 -
 Bubbling Pumpkin CauldronSkill level: Beginner
 -
 Custom Charcuterie DisplaySkill level: Beginner
 -
 St. Patrick’s Day DecorSkill level: Beginner
 -
 Butterfly Pixel Wall ArtSkill level: Beginner
 -
 Fruit Appetizer TreesSkill level: Beginner
 -
 Easter Egg Table DécorSkill level: Beginner
 -
 Shamrock Porch DécorSkill level: Beginner
 -
 Eyeballs Everywhere WreathSkill level: Beginner
 -
 Narwhal Wall ArtSkill level: Beginner
 -
 Painted Cactus Wall ArtSkill level: Beginner
 Subscribe


