
Supplies
- FloraCraft® CraftFōM®:
- (1) 2" Ball - White
- (3) 2.5" Ball - White
- (1) 3” Ball - White
- (5) 4" Eggs - White
- (1) 3" Block - White
- Spray Paints - Fuchsia
- Acrylic Paints:
- Yellow
- Green
- Pink
- Purple
- Blue
- Dimensional Fabric Paint - Purple
- 1/4" Ribbon - Pink
- Buttons:
- (2) 1.5” - Blue
- (2) ¾” - Blue
- Feather Boa - Bright Green
- Chenille Stems - Pink
- 3/16" Wood Dowel
Tools
- Foam Cutter or Serrated Knife
- Wire Cutter
- Low-Temp Glue Gun
- Scissors
- Clear Tape
Instructions
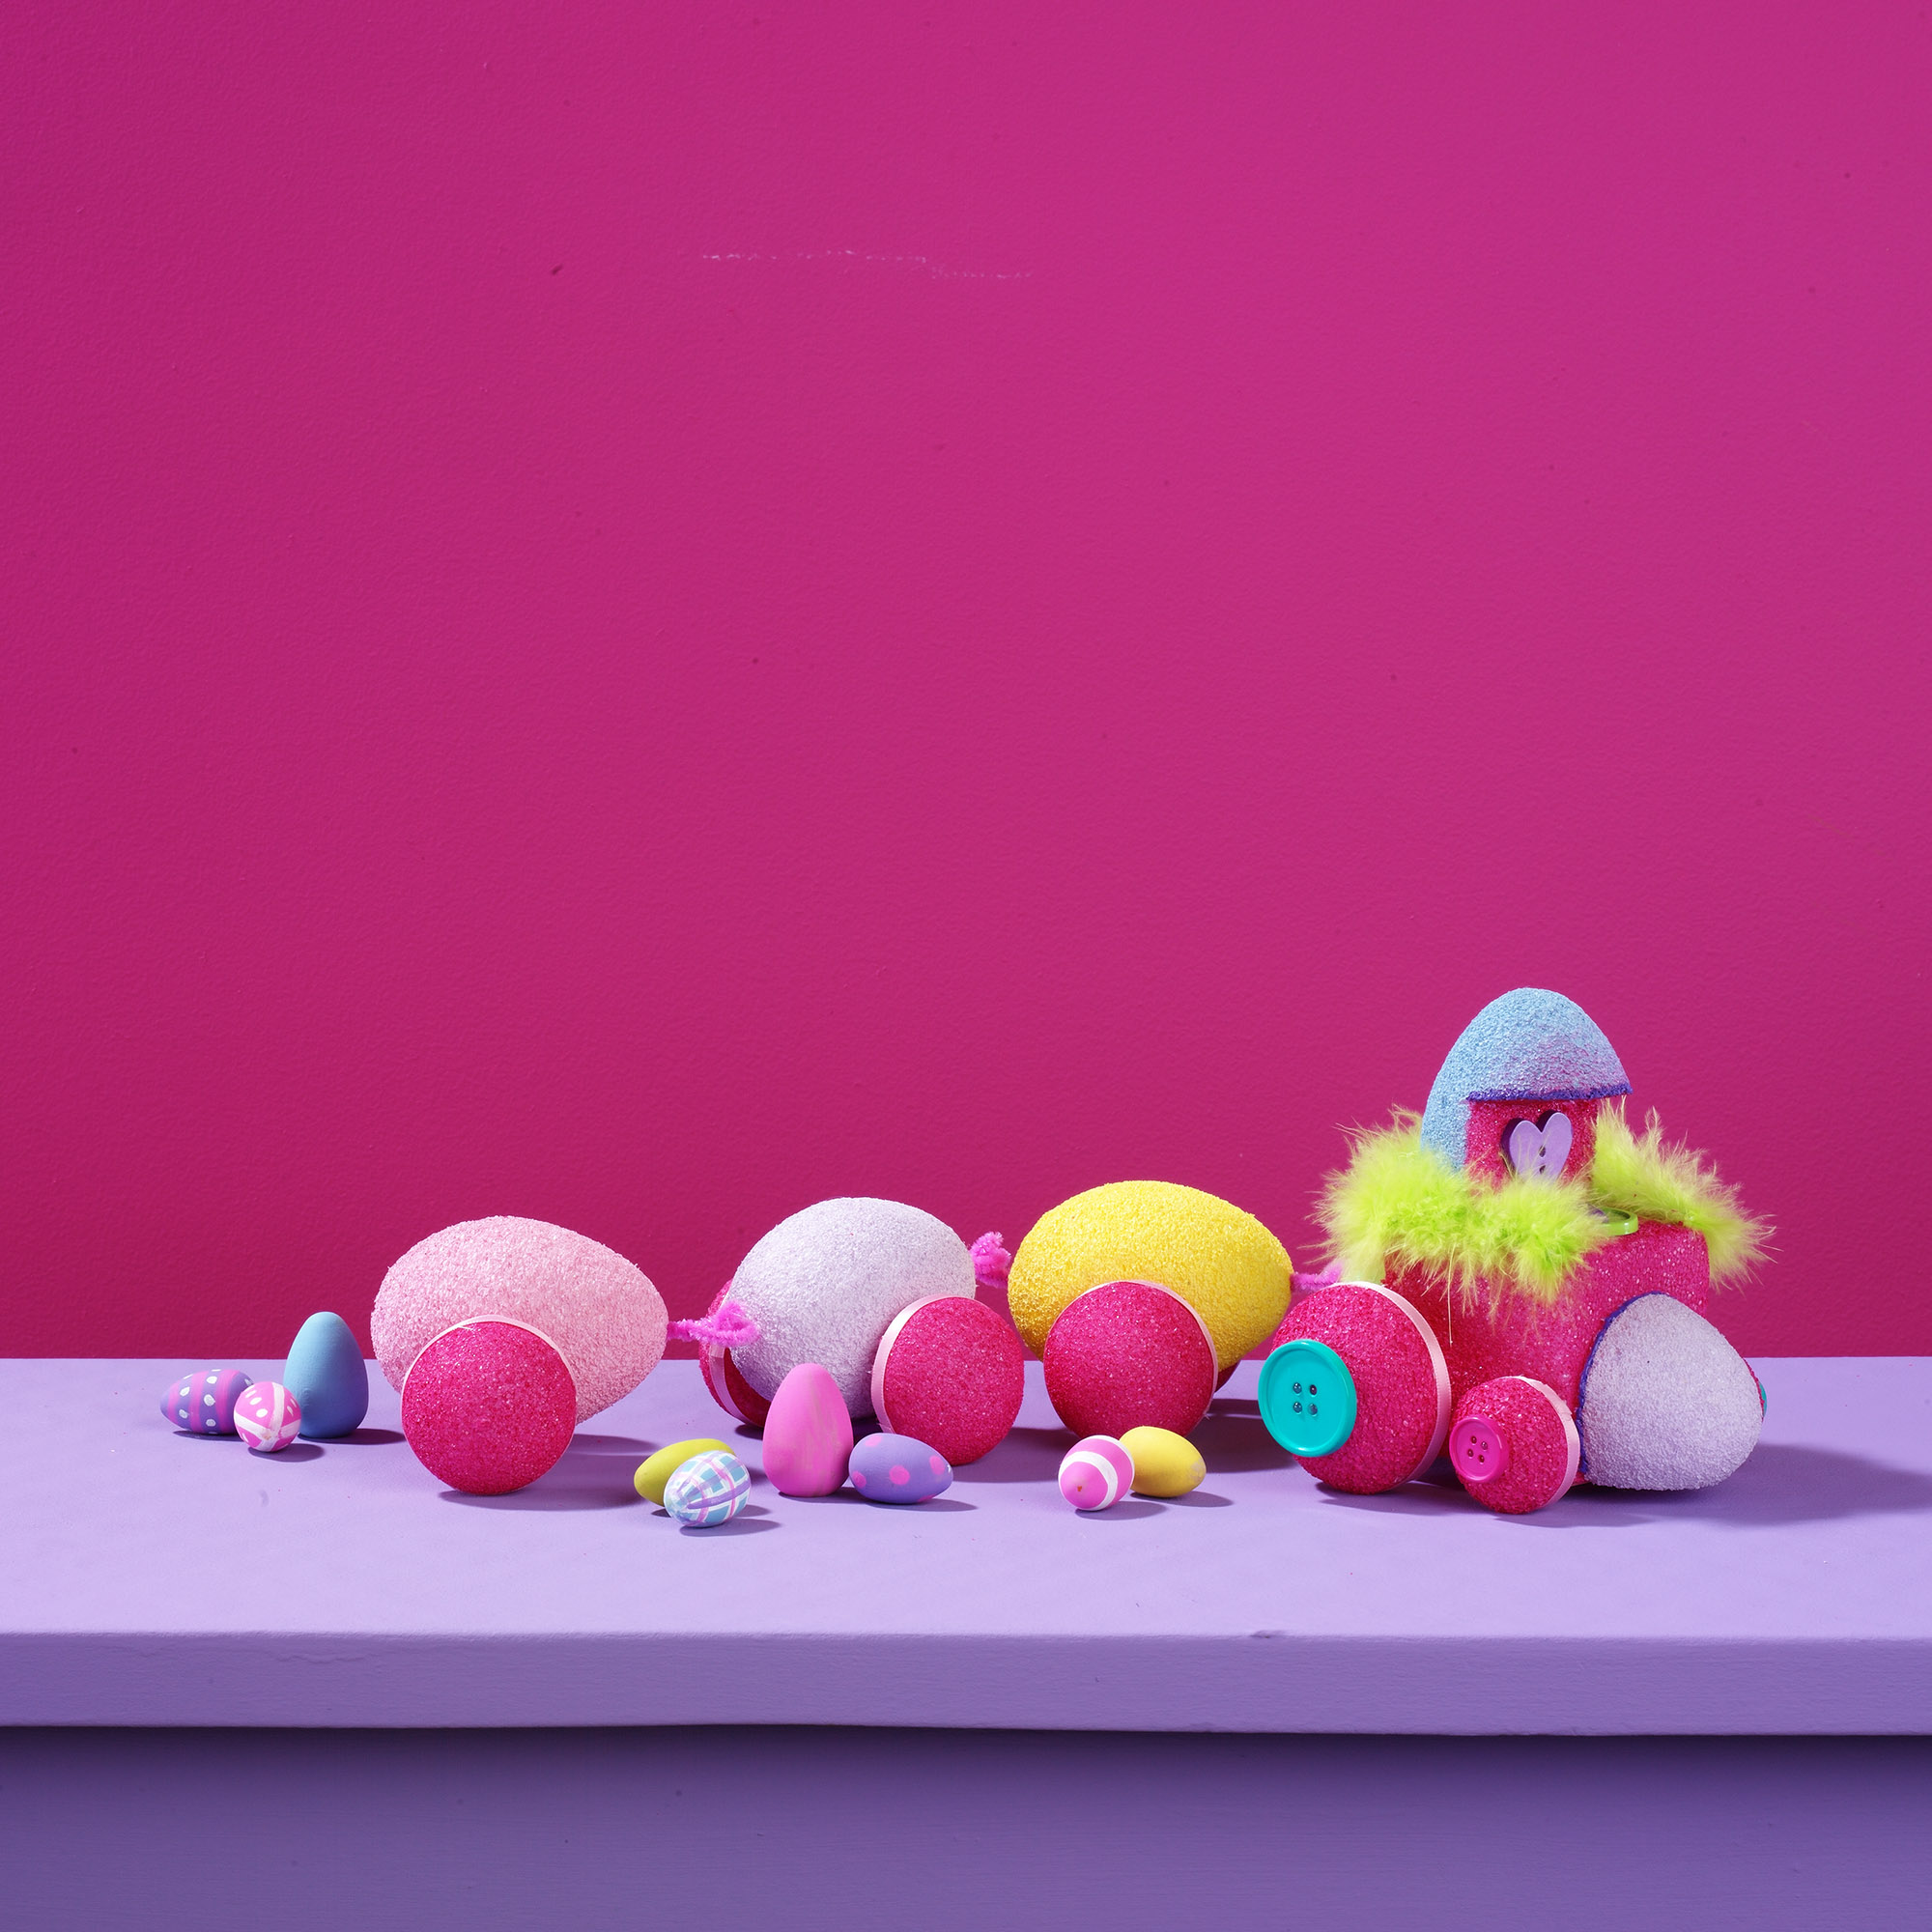
- The wheels: Use the serrated knife to cut all the balls exactly in half. Press and roll the cut edges of the half balls on the table to flatten slightly. Spray paint all the balls and the cube fuchsia following the instructions on the can. Be sure to hold the can 12” away, applying 2 or 3 light coats to achieve your shade and letting each coat dry before applying the next. Let dry completely. Glue pink ribbon around the flattened outside edges of all the half balls.
- The train engine: Cut an egg in half (separating the narrow end from the wide end). Set aside the wide end for a future project. Set the narrow end on the table cut side down and cut a small slice off, about ½” in from the side. Paint this half egg purple and let dry. Glue the egg to one side of the 3” cube keeping the flat side of the egg even with the bottom of the cube. This is the front of the engine. Cut another egg in half lengthwise, from narrow end to wide end, creating two equal halves. Set half the egg aside for future projects. Cut straight across the wide end of the egg, cutting off about ½” in from the end. Paint this half egg green and let dry. Glue this egg to the back of the train, keeping the cut end even with the bottom of the cube. Cut about 1” off the wide end of another egg. Stand the egg on the narrow end and cut across the center of the bottom about halfway into the egg and pull out the blade. Be careful not to push too hard while cutting or you will flatten the top of the egg. Now stand the egg, narrow end up. About half way down from the top, cut horizontally into the side of the egg meeting the first cut you made. This creates an “L” shaped wedge from the side of the egg. Paint this egg blue and let dry. Glue to the top back edge of the cube as shown for the engine car roof. Cut two 4.5” pieces of wood dowel, spray paint them fuchsia, and let dry. Lay the engine on its side and push one dowel into the bottom back corner, about ½” up from the bottom and ¼” in from the back. Pull the dowel out and wrap one end with several layers of clear tape to make the end bigger, then run the taped end back thru the hole to make the hole larger than the dowel. This allows the dowel to move more freely in the hole. Remove the tape. Glue the 3” half ball wheels to the dowel on both sides of the cube leaving about ¼” space between the side of the cube and the wheel. Push the second dowel into the cube about ¼” up from the bottom and ¼” in from the front, repeat gluing the 2” half ball wheels in place. Glue buttons to the wheels and to the top of the cube as shown. Use the purple fabric paint to add detail around the edge of the half egg at the front of the train and the roof edge. Pin a piece of feather boa around the top edge of the cube.
- The train cars: Cut three 4.5” dowels, spray paint them fuchsia and let dry. Lay the eggs on their sides and make two parallel cuts, about ¼” apart, into the center of the side of each egg (about 2.5” across and about ½” deep). Now scrape out the groove for the dowels. Paint one car yellow, one purple, and one pink. Let dry. Glue the wheels to the dowels, the same way as the engine wheels leaving a gap between the egg and the wheel. Place the wheel assembly into the grooves on each egg. Glue on a large button over the dowel to keep the wheels from slipping back out of the groove.
- Cut 3” pieces of chenille stems and bend them in half, twisting the two ends together. Bend one into a hook and glue the twisted ends into the back of the train engine. Be sure the hook is level with the front of the first car. Shape another twisted chenille stem piece into a loop and glue the ends into the front of the first car. Place the loop onto the hook of the train. Repeat to attach the two remaining cars.
-
 Celebratory Candy CakeSkill level: Beginner
 -
 Teacher Gift MugSkill level: Beginner
 -
 Bubbling Pumpkin CauldronSkill level: Beginner
 -
 Custom Charcuterie DisplaySkill level: Beginner
 -
 St. Patrick’s Day DecorSkill level: Beginner
 -
 Butterfly Pixel Wall ArtSkill level: Beginner
 -
 Fruit Appetizer TreesSkill level: Beginner
 -
 Easter Egg Table DécorSkill level: Beginner
 -
 Shamrock Porch DécorSkill level: Beginner
 -
 Eyeballs Everywhere WreathSkill level: Beginner
 -
 Narwhal Wall ArtSkill level: Beginner
 -
 Painted Cactus Wall ArtSkill level: Beginner
 Subscribe


