
Supplies
- FloraCraft® CraftFōM®:
- 4" x 15" Cone - White
- Burlap Garland
- Mini Fruit:
- Red Apples
- Pears
- Wired Sisal Rope - Brown
- FloraCraft® Diamond Dust™
- Artificial Snow
- Spray Paint:
- White
- Copper
- Antique Gold
- Bronze
- Silver
- Spray Adhesive
- Toothpicks
Tools
- Low-Temp Glue Gun
- Scissors
- Floral Pins
Instructions
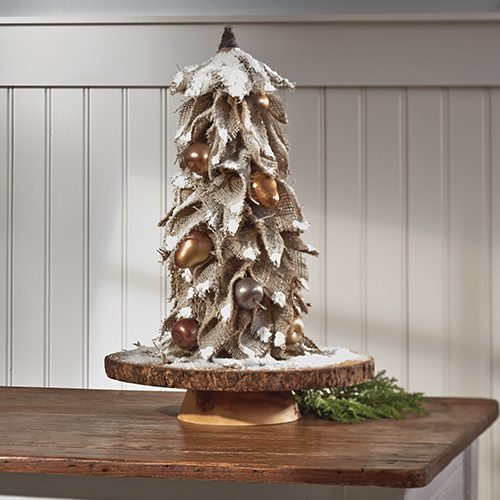
- Cut 5” lengths of burlap to create 5”x5” squares. Fold two opposite corners of the square in to meet at the center. Now fold one of the remaining corners down over the center so that the tip of this corner is about 1” up from the tip of the other corner. Gather the folded edge of the burlap and pin it about 2” up from the bottom of the cone. Continue folding and pinning squares around the cone. Repeat pinning a second row about 2” above the first row and so on to completely cover the cone. At the top of the cone, gather the folded ends of the burlap and wrap them with wired sisal rope to create the point as shown.
- Spray paint the tree lightly with white spray paint, letting some of the burlap color show through. Applysnow to all the tips of the burlap “branches” and let dry. Spray the tree with adhesive and sprinkle with Diamond Dust® glitter.
- Spray paint the fruit in assorted metallic colors and let dry. Insert toothpicks into the bottom, then glue the fruit tucked into the burlap evenly spaced.
-
 Celebratory Candy CakeSkill level: Beginner
 -
 Teacher Gift MugSkill level: Beginner
 -
 Bubbling Pumpkin CauldronSkill level: Beginner
 -
 Custom Charcuterie DisplaySkill level: Beginner
 -
 St. Patrick’s Day DecorSkill level: Beginner
 -
 Butterfly Pixel Wall ArtSkill level: Beginner
 -
 Fruit Appetizer TreesSkill level: Beginner
 -
 Easter Egg Table DécorSkill level: Beginner
 -
 Shamrock Porch DécorSkill level: Beginner
 -
 Eyeballs Everywhere WreathSkill level: Beginner
 -
 Narwhal Wall ArtSkill level: Beginner
 -
 Painted Cactus Wall ArtSkill level: Beginner
 Subscribe


