
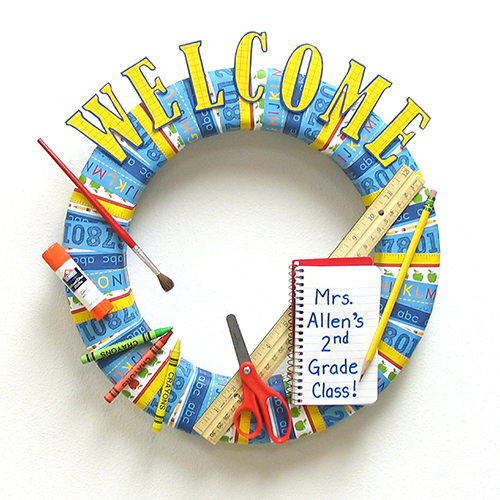
Supplies
- FloraCraft® CraftFōM®:
- 14" Wreath - White
- 12" x 12" Scrapbook Paper:
- School Buses
- (4) Ruler Stripe
- 2.5" Letters - "WELCOME"
- Wood Ruler
- Scissors
- Yellow Pencil
- Mini Spiral Notebook
- (3) Crayons
- Paintbrush
- Glue Stick
Tools
- Craft Knife
- Large Paper Clip
- Fine Tip Paint Marker - Blue
- Glue Spots - Small and Medium
- All-Purpose Glue Sticks
- 12" Rotary Paper Trimmer
- 12" Square Self-Healing Cutting Mat
Instructions
- Use paper trimmer to cut approx. 1″ x 9″ strips from four sheets “Ruler Stripe” paper, following along with printed stripes. Note that to wrap the wreath in paper strips, papers will slightly overlap along the outside but will overlap by about half the strips’ width on the inside edge of the wreath. This allows for even wrapping all around the wreath. Apply glue stick to the wreath, going all around the wreath for several inches at a time—wrap paper strip, with ends slightly overlapping on the back. Continue going around the wreath.
- For the hanger, on the top back, use a craft knife to make a 1/4″ long, shallow horizontal slit (about 1/4″ from the inside edge of the wreath). Carefully insert the knife blade into the slit, angled toward the top, and remove it. Slightly separate curved ends of paper clip 1/4″. Insert the shorter rounded end into the slit, creating a hanger loop with the longer end of paper clips. (Glue if loose.)
- To cover letters, turn “School Buses” paper on the right side (yellow check) on the table. Apply glue stick to fronts of letters and place onto the back of the paper—place paper on self-healing cutting mat. Use precision tips and scissors to cut apart letters. Then, use a craft knife to cut paper with edges of letters—outline letters with a blue paint marker. Let dry.
- Refer to the photo to evenly place letters at the top of the wreath, keeping in mind the position of the hanger on the back. With the top 2/3 of letters extending beyond the edge of the wreath, use glue spots to attach.
- Use a paint marker to write the teacher’s name and class on the first page of the opened notebook. Refer to photos to plan the placement of school items. Use appropriate size glue spots to attach.
- Optional: Tuck children’s school pictures among items on the wreath.
-
 Celebratory Candy CakeSkill level: Beginner
 -
 Teacher Gift MugSkill level: Beginner
 -
 Bubbling Pumpkin CauldronSkill level: Beginner
 -
 Custom Charcuterie DisplaySkill level: Beginner
 -
 St. Patrick’s Day DecorSkill level: Beginner
 -
 Butterfly Pixel Wall ArtSkill level: Beginner
 -
 Fruit Appetizer TreesSkill level: Beginner
 -
 Easter Egg Table DécorSkill level: Beginner
 -
 Shamrock Porch DécorSkill level: Beginner
 -
 Eyeballs Everywhere WreathSkill level: Beginner
 -
 Narwhal Wall ArtSkill level: Beginner
 -
 Painted Cactus Wall ArtSkill level: Beginner
 Subscribe


