
Supplies
- Gator Pencil Puppet
- FloraCraft® CraftFōM®:
- (2) 1" Balls -- White
- (1) 4" Ball -- White
- (1) 6" Cone -- White
- Acrylic Paint:
- Green
- Red
- Chenille Stems:
- Green
- White
- 15mm Wiggle Eyes
- New Pencil
- FloraCraft® CraftFōM®:
- Pig Pencil Puppet
- FloraCraft® CraftFōM®:
- (1) 1" Ball -- White
- (1) 1.5" Ball -- White
- (1) 4" Ball -- White
- (1) 2" Egg -- White
- Acrylic Paint:
- Pink
- 15mm Wiggle Eyes
- Chenille Stem:
- Pink
- Black
- New Pencil
- FloraCraft® CraftFōM®:
- Frog Pencil Puppet
- FloraCraft® CraftFōM®:
- (1) 1.5" Ball -- White
- (1) 3" Ball -- White
- Acrylic Paint:
- Bright Green
- Chenille Stems:
- Green
- Pink
- 15mm Wiggle Eyes
- New Pencil
- FloraCraft® CraftFōM®:
- Lion Pencil Puppet
- FloraCraft® CraftFōM®:
- (2) 1.5" Balls -- White
- (1) 4" Ball -- White
- Acrylic Paint:
- Golden Yellow
- Chenille Stems:
- Brown
- 15mm Wiggle Eyes
- 1/2" Pompom -- Black
- New Pencil
- FloraCraft® CraftFōM®:
- Elephant Pencil Puppet
- FloraCraft® CraftFōM®:
- (4) 1" Balls -- White
- (1) 1.5" Ball -- White
- (1) 4" Ball -- White
- (1) 3" Egg -- White
- Acrylic Paint:
- Grey
- Light Blue
- Chenille Stems:
- White
- 15mm Wiggle Eyes
- New Pencil
- FloraCraft® CraftFōM®:
- Mouse Pencil Puppet
- FloraCraft® CraftFōM®:
- (1) 2" Ball -- White
- (1) 4" Ball -- White
- Acrylic Paints:
- Grey
- Chenille Stems:
- Black
- Pink
- 15mm Wiggle Eyes
- ½” Pompom -- Black
- New Pencil
- FloraCraft® CraftFōM®:
Tools
- Foam Cutter
- Low-Temp Glue Gun
- Paint Brush
Instructions
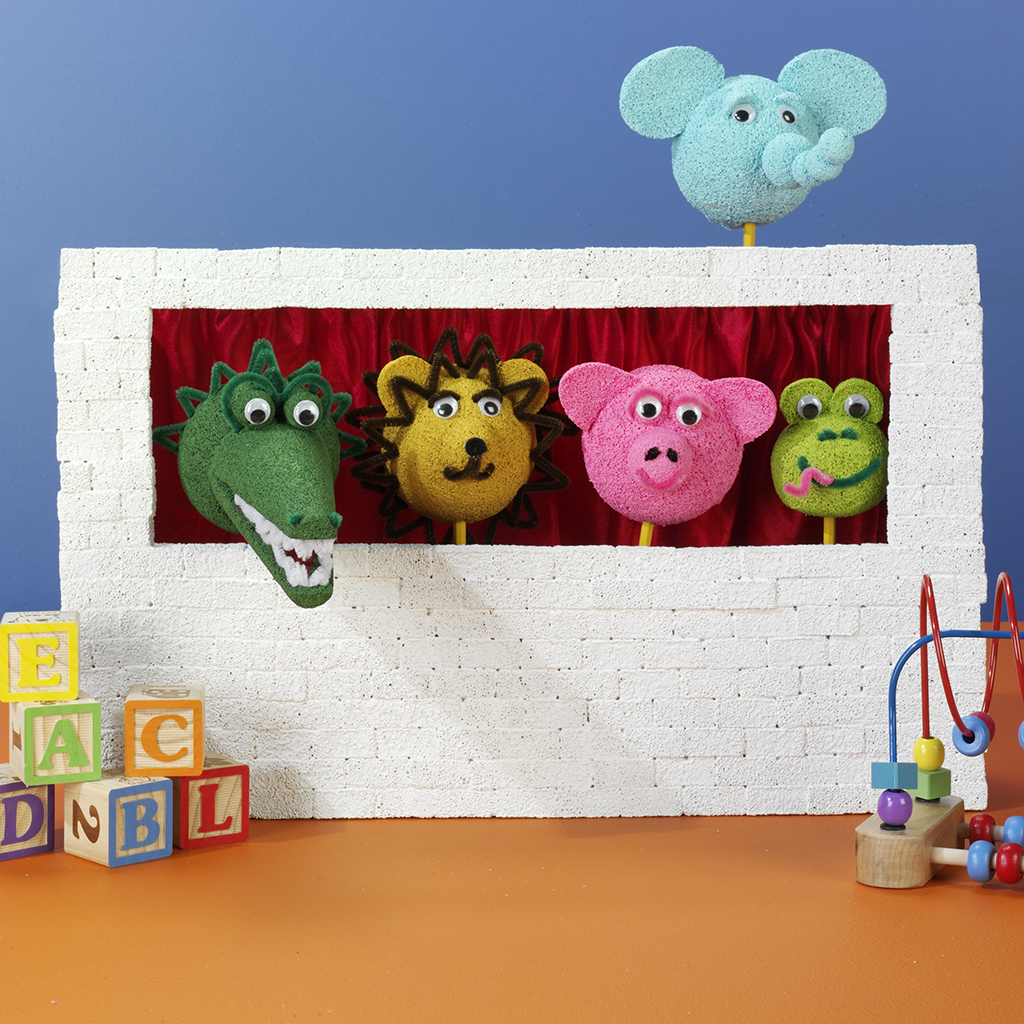
Gator Pencil Puppet
- Cut a 4″ ball in half. Set half aside for future projects.
- Cut two ¼” thick slices from the center of the 2″ ball; these are the ears. Cut a small flat spot off one side of each ear; this is where it will attach to the head. Shape one of the remaining sections of the ball into a cone-shaped nose by rolling and pressing firmly on the table. Cut the last section of the ball in half and shape it into eyelids using your fingers to compress the foam.
- Paint all the parts grey and let them dry.
- Glue the ears and face in place as pictured. Glue the eyelids just slightly overlapping the wiggle eyes.
- Glue the black pompom to the tip of the nose. Cut chenille stem pieces for whiskers and glue in place. Cut pieces of pink chenille stem and roll them up for the inside of the ears, glue in place.
- Glue the pencil into the bottom of the head.
Pig Pencil Puppet
- Cut the 4″ ball in half for the head.
- Cut the egg in half lengthwise for the ears. Cut a small flat spot off the wide end of the egg where it attaches to the head.
- Cut the 1″ ball in half for the eyes.
- Cut a flat spot off one side of the 1.5″ ball and roll the sides on the table firmly to create the pig’s snout.
- Paint all the parts pink and let them dry.
- Glue the ears to either side of the top of the head. Glue the foam eyes side by side just below the ears and glue the wiggle eyes in place. Glue the snout in place below the eyes.
- Cut small pieces of pink chenille stem and glue in place for the eyelids and mouth. Cut two small pieces of black stem and glue in place for the nostrils.
- Glue the pencil into the bottom of the head.
Frog Pencil Puppet
- Cut a small slice off two opposite sides of the 3″ ball. Roll the cut sides of the ball on the table, applying pressure to round the edges and create an oval-shaped head.
- Cut the 1.5″ ball in half for the eyes.
- Paint the head and the eyes bright green and let dry.
- Glue the foam eyes side by side to the top of the head, cut side facing front—glue wiggle eyes in place.
- Cut two 1″ pieces of green stem, fold each in half and glue into the face for nostrils. Cut another piece for the mouth, bend each end of the mouth in towards the face about ¼”, add glue to the ends and insert the ends into the face. Cut a small piece of pink and glue in place for the tongue.
- Glue the pencil eraser end down into the bottom of the head.
Lion Pencil Puppet
- Cut the 4″ ball the half, save one half for future projects.
- Cut one 1.5″ ball in half; these are the ears. For the nose, press a flat spot on one side of the other 1.5″ ball; this is where the nose will attach to the face, round the sides of the ball on the table to create an oval-shaped muzzle. Paint all the foam pieces golden yellow and let dry.
- Press a flat spot on the ears to attach to the head and glue in place. Glue the nose in place and glue the black pompom to the end. Glue the wiggle eyes in place. Cut small stem pieces for the eyebrows and mouth and glue them in place as shown.
- Fold chenille stem pieces into a zigzag pattern and glue the ends around the face for the mane.
- Glue the pencil into the bottom of the head.
Elephant Pencil Puppet
- Cut the 4″ ball in half for the head, save the other half for future projects. Cut the egg in half lengthwise for the ears. Cut one of the 1″ balls in half for the eyelids. Paint all the foam parts grey or light blue and let dry.
- For the trunk, thread the 1.5″ ball and three 1″ balls onto a piece of the stem, leaving 1″ of stem at the end to attach to the face. Press them together firmly where they meet on the stem. Glue the trunk to the center of the face.
- Glue the ears cut side to the front to the top of the head angle as shown. Press a flat spot on the ear where it attaches to the head.
- Glue the two wiggle eyes in place. Press a flat spot on the backs of the eyelids where they attach to the head and glue in place over the top of each eye as shown.
- Glue the pencil into the bottom of the head.
Mouse Pencil Puppet
- Cut a 4″ ball in half. Set half aside for future projects.
- Cut two ¼” thick slices from the center of the 2″ ball; these are the ears. Cut a small flat spot off one side of each ear; this is where it will attach to the head. Shape one of the remaining sections of the ball into a cone-shaped nose by rolling and pressing firmly on the table. Cut the last section of the ball in half and shape it into eyelids using your fingers to compress the foam.
- Paint all the parts grey and let them dry.
- Glue the ears and face in place as pictured. Glue the eyelids just slightly overlapping the wiggle eyes.
- Glue the black pompom to the tip of the nose. Cut chenille stem pieces for whiskers and glue in place. Cut pieces of pink chenille stem and roll them up for the inside of the ears, glue in place.
- Glue the pencil into the bottom of the head.
-
 Celebratory Candy CakeSkill level: Beginner
 -
 Teacher Gift MugSkill level: Beginner
 -
 Bubbling Pumpkin CauldronSkill level: Beginner
 -
 Custom Charcuterie DisplaySkill level: Beginner
 -
 St. Patrick’s Day DecorSkill level: Beginner
 -
 Butterfly Pixel Wall ArtSkill level: Beginner
 -
 Fruit Appetizer TreesSkill level: Beginner
 -
 Easter Egg Table DécorSkill level: Beginner
 -
 Shamrock Porch DécorSkill level: Beginner
 -
 Eyeballs Everywhere WreathSkill level: Beginner
 -
 Narwhal Wall ArtSkill level: Beginner
 -
 Painted Cactus Wall ArtSkill level: Beginner
 Subscribe


