
Supplies
- FloraCraft® CraftFōM®:
- 5" Ball - White
- FloraCraft® SmoothFōM®:
- (2) 2" Balls - White
- Decorative Mesh:
- 10" x 7 yds - Orange
- 1 yd - Light Green (Optional for Display)
- Spray Color:
- Orange
- Bright Green
- Paint Markers:
- Black
- Light Blue
- White
- Chenille stems, 12" lengths, two orange, one red
Tools
- Foam Cutter
- 8" Scissors
- Ruler
- Pencil
- Low-Temp Glue Gun and Glue Sticks
- Old Newspapers
- Cardboard Box (For Spraying)
Instructions
- Use Foam Cutter to cut off 4″ diameter slice from bottom of 5″ Ball, so that monster has a base. Brush off crumbs.
- In a well-ventilated, newspaper-covered area, inside a cardboard box, spray a large ball Orange and two small balls Olive Bright. Let dry.
- Use scissors to cut five yards of Orange Decorative Mesh into 5″ squares. (Note: squares do not have to be perfect, and fraying adds to the charm. Wait to cut the remaining yardage of Orange as needed. Save Green Decorative Mesh for display.)
- The orange ball will be covered with mesh, except on the bottom, so that monster can be set flat on the table or floor. With the ball flat on a table, use a pencil to press a hole in a ball at the bottom (about 3/4″ deep). (Note: Hole should be parallel with the table.) Pick up the ball, and squeeze glue gun glue into the hole. Find the center of one mesh square, gather edges, and twist the center down into the hole.
- Repeat the next hole about 1″ away from the first, along the bottom edge. Practice a couple of times to coordinate applying glue in hole and gathering mesh so that glue hasn’t cooled by the time the mesh is inserted. Continue all around the bottom of the ball.
- Make holes spaced 1″ away above and staggered above the first row for the next row. Continue making staggered horizontal rows around the ball until the entire ball (except the base) is filled. Use extra yardage of mesh if needed.
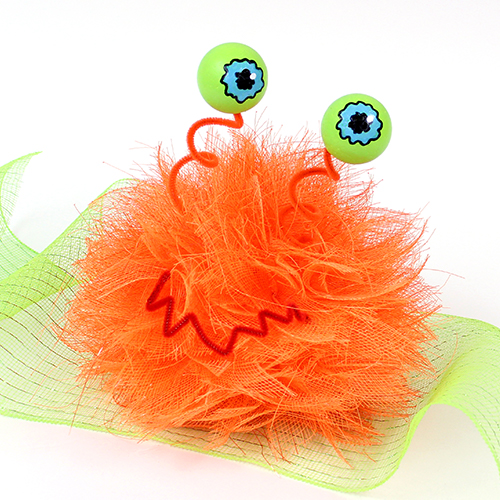
- Refer to photo. For each eye, use a Black paint marker to draw a squiggly circle and then a smaller squiggly circle inside that. Fill in a smaller one with black. When dry, fill the area between squiggles with a Light Blue paint marker. Let dry. (Apply a second coat for brighter colors, if desired.) Add a dot of white in each eye for highlight. Let dry.
- Wrap the orange chenille stem around the paint marker to coil and remove. Push end of chenille stem into bottom of eyeball. (Apply glue if needed to hold.) Press the other end of the stem in between Orange mesh into an orange ball. Repeat with other eye. Allow eyes to wobble above the surface of the mesh.
- For the mouth, bend the red chenille stem into irregular zig zags and curve it into a smile. Insert stem ends into mesh and pinch ends to hold. (Note: stem ends do not need to go down into the ball all the way – just pinched onto the mesh.) Display Monster on Green mesh.
-
 Celebratory Candy CakeSkill level: Beginner
 -
 Teacher Gift MugSkill level: Beginner
 -
 Bubbling Pumpkin CauldronSkill level: Beginner
 -
 Custom Charcuterie DisplaySkill level: Beginner
 -
 St. Patrick’s Day DecorSkill level: Beginner
 -
 Butterfly Pixel Wall ArtSkill level: Beginner
 -
 Fruit Appetizer TreesSkill level: Beginner
 -
 Easter Egg Table DécorSkill level: Beginner
 -
 Shamrock Porch DécorSkill level: Beginner
 -
 Eyeballs Everywhere WreathSkill level: Beginner
 -
 Narwhal Wall ArtSkill level: Beginner
 -
 Painted Cactus Wall ArtSkill level: Beginner
 Subscribe


