
Supplies
- FloraCraft® CraftFōM®:
- Project Bricks-Haunted Edition
- Acrylic Paint - Black
Tools
- Foam Cutter or Serrated Knife
- Pencil
- Paper
- Scissors
- Paint Brush
- Low-Temp Glue Gun and Glue Sticks
- Wire Cutters
Instructions
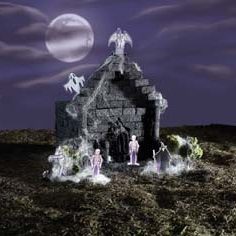
- Starting the bottom layer and structure: Glue five bricks together end to end for wall 1; repeat this to create walls 2, 3, and 4. Glue the end bricks from walls 1 and 2 together to form a corner. Repeat to add walls 3 and 4. This completes the square bottom layer. Repeat these steps to lay seven more layers of bricks. When adding layers of bricks to the structure, center them over the joints of the bricks in the previous layer. Before gluing layer eight in place, fill in the square to make a roof.
- Adding steps: Glue five bricks together end to end; glue them centered along the bottom of one wall to create top steps. Cut three bricks in half lengthwise; glue five of the brick halves together end to end, then glue them to the front of the top steps to create the bottom steps.
- Cutting the door: Draw the shape of the entry door on a piece of paper to measure about 2.5 inches wide by 4.5 inches high. Cut out the paper door shape with scissors, center it above the top steps and pin it in place. To cut the door out of foam, use the StyroCutter Plus, the Foam Cutter, or a serrated knife. (See Note) Insert the blade at the bottom corner of the paper template. Applying even pressure, the blade gently traces the outline and cuts out the door. If using the StyroCutter Plus, do not force the blade or allow it to bend, and take extra care in cutting through the glue. Once the door is cut out, sand the door edges smooth, if needed. The foam acts like fine sandpaper when rubbed together. For smooth edges, rub the door edges with another piece of STYROFOAM*. Paint the exposed door edges with black acrylic paint and let dry.
- Creating the pillars: Roll 12 bricks on the table to create round columns. Glue four columns end to end to create a pillar. Repeat for second pillar. Glue the pillars to the front of the mausoleum on either side of the steps. These are the awning supports. Glue the four remaining columns to the front of each pillar and on either side of the door. Cut two bricks in half. Roll the halves into four round balls. Glue the cut side of the each ball to the top of each column.
- Building the roof awning: Glue seven bricks together end to end. Repeat with 6, 5, 4, 3, and 2 bricks. Glue the six bricks on top of the seven. Repeat the layers, from longest to shortest, to form a pyramid shape; add a single brick to the top. Glue the pyramid to the top of the mausoleum, about one brick back from the front edge. Glue two bricks to the front side of each bottom end brick, above each pillar. Glue two bricks to the front side of each end brick for the remaining layers.
- Creating the metal style gate: This step uses the black chenille stems included in the Project Bricks-Haunted Edition kit.Cut three stems to fit doorway. Attach together by twisting two other stems, cut to fit the width of the doorway, around them. Make small U-shaped hinges from 1 inch lengths of stems. Hold the gate up to the doorway and push the hinges into the inside edge of the doorway to secure the gate in place. (See photo)
Optional: Cut out figurines from the kit box, following the directions on the package, and place them around the mausoleum to create a scary scene.
NOTE: Adult supervision is necessary when using these tools.
-
 Celebratory Candy CakeSkill level: Beginner
 -
 Teacher Gift MugSkill level: Beginner
 -
 Bubbling Pumpkin CauldronSkill level: Beginner
 -
 Custom Charcuterie DisplaySkill level: Beginner
 -
 St. Patrick’s Day DecorSkill level: Beginner
 -
 Butterfly Pixel Wall ArtSkill level: Beginner
 -
 Fruit Appetizer TreesSkill level: Beginner
 -
 Easter Egg Table DécorSkill level: Beginner
 -
 Shamrock Porch DécorSkill level: Beginner
 -
 Eyeballs Everywhere WreathSkill level: Beginner
 -
 Narwhal Wall ArtSkill level: Beginner
 -
 Painted Cactus Wall ArtSkill level: Beginner
 Subscribe


