
Supplies
- FloraCraft® CraftFōM®:
- (2) 3" Balls - White
- 12" Balloons:
- Green
- Yellow
- 3/4" Felt buttons:
- (6) 3/4" Blue
- (6) 3/4" Green
- (8) 3/4" Teal
- (1) 1.25" Green
- (2) 1.25" Teal
- 1.5" Wood Button (To Weight Base)
- Acrylic Paint - Green
- 3/16" x 7" Wood Dowel
- (2) 5mm Beads - Black
- (2) Straight Pins
Tools
- Foam Cutter
- Scissors
- Ruler
- Paintbrush
- Teaspoon
- Glue Gun and Glue Sticks
- Old Newspaper
Instructions
- On a newspaper-covered work surface, paint one Foam Ball green. Let dry.
- Use scissors to cut a 1/2″ length slit in the rounded end of the green balloon. With a helper, stretch the balloon over the green Ball. To close the opening, apply a small amount of hot glue to the Ball, wait momentarily, then overlap the cut edges and press onto the glue. For fish lips, roll the neck of the balloon back on itself.
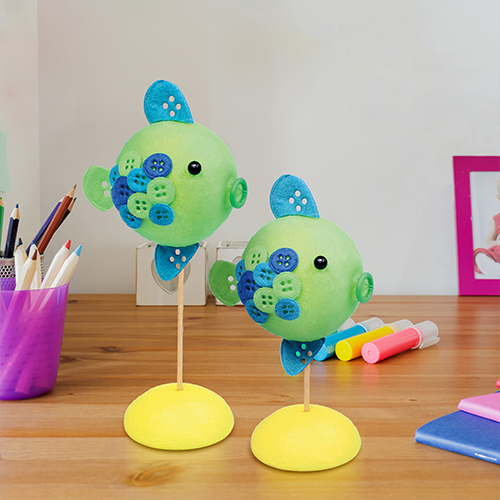
- Refer to photo. On the work surface, arrange 3/4″ felt buttons by overlapping to look like fish scales, using half the felt buttons: three blue, three green, and four teal. (Note: There are two, three, two, and three felt buttons in each vertical row of scales.) One at a time, on the side of the fish, beginning toward the back, pin scales in place (to plan spacing and position). Adjust as needed. Then remove one or two scales at a time, set aside pins, apply hot glue to felt button – wait momentarily and press onto side of fish. Repeat on other side.
- For eyes, insert a straight pin into beads and attach it to the fish on both sides. For the tail, refer to the photo to cut pieces off a 1 1/2″ diameter green felt button to make one wedge-shaped tail. Apply hot glue to the edge of the felt button, wait momentarily and attach it to the back of the fish. For top and bottom fins, refer to the photo to trim two teal buttons and glue edges to the body.
- Use Foam Cutter to cut the other Ball in half for the base. (Set aside one half for future use.) Use a teaspoon to carve foam to fit the wood button on the flat side. (Note: Curved side of button fits up into Ball-half, so flat part is even with foam and sets flat on the table.) Hot glue in place.
- Cut the neck off the yellow balloon. With a helper, stretch the balloon over the rounded part of the Ball-half base. (Note: There is no need to glue since the stretchiness of the balloon holds it in place.) Use a point of scissors to make a small hole on top of the ball and insert the dowel. Remove dowel, apply glue to dowel end and reinsert into the base.
- Similarly, make a hole and insert the dowel into the bottom of the fish, adjusting it to the desired height.
-
 Celebratory Candy CakeSkill level: Beginner
 -
 Teacher Gift MugSkill level: Beginner
 -
 Bubbling Pumpkin CauldronSkill level: Beginner
 -
 Custom Charcuterie DisplaySkill level: Beginner
 -
 St. Patrick’s Day DecorSkill level: Beginner
 -
 Butterfly Pixel Wall ArtSkill level: Beginner
 -
 Fruit Appetizer TreesSkill level: Beginner
 -
 Easter Egg Table DécorSkill level: Beginner
 -
 Shamrock Porch DécorSkill level: Beginner
 -
 Eyeballs Everywhere WreathSkill level: Beginner
 -
 Narwhal Wall ArtSkill level: Beginner
 -
 Painted Cactus Wall ArtSkill level: Beginner
 Subscribe


