Supplies
- FloraCraft® CraftFōM®:
- 12" Wreath - White
- 1/4 yd x 72" Felt - Gold
- (8) Felt Embellishments, Accent
- (3) Daisies:
- Lavender
- Purple
- Orange
- (2) Bows:
- Red
- Blue
- Leaves:
- (2) Light Green
- (3) Dark Green
Tools
- Foam Cutting Tools
- 8" Scissors
- Craft Knife
- Ruler
- Permanent Fine Line Marker
- Old Newspaper
- Copy Paper
- Transparent Tape
- Pencil
- Glue Gun and Glue Sticks
- Large Paper Clip (Hanger)
Instructions
- To make pattern for wreath sections, trace Foam Beveled Ring onto newspaper and cut out. Fold paper circle in half and then half again (creating fourths). While still folded, fold circle into thirds. Unfold. (There should be twelve even sections between fold lines.) Place pattern on top of Ring. For guidelines, use permanent fine line marker and ruler to mark sections on outside edge of Ring. Remove pattern. Now think of ring as a clock. To mark top of ring, place ruler on top and connect 12 o’clock and 6 o’clock lines, drawing lines across top surface. Rotate ruler to 3 and 9 o’clock position and draw lines. Continuing drawing lines to divide Ring into twelve sections. Repeat to mark back of wreath as well.
- Trace felt Section Pattern onto copy paper and cut out. Use loops of tape to attach pattern to felt and cut out. Repeat to cut total of twelve felt pieces.
- To cover first section, wrap one felt piece around wreath with narrow end wrapping toward center and wide end wrapping to back. (Note: Felt will overlap marked lines by approx. 1/4″.) Starting on top surface, using Make It: Fun® Tuck and Scribe tool, push felt edge into wreath, about 1/4″ deep, on marked lines. Continue by tucking felt on inside and outside edges and then on back surface. (Note: Wait to glue ends until all sections covered.) Repeat to attach other felt pieces to cover wreath. Turn wreath to back, overlap and hot glue ends of felt to wreath. (Note: It may be necessary to trim ends or make small pleats to fit.)
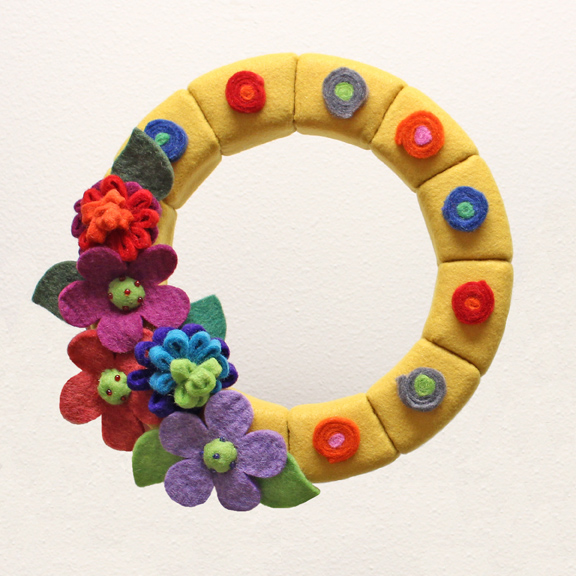
- Refer to photo to place one felt sushi, centered, on sections located at top and right, alternating colors as desired. Hot glue in place.
- Referring to photo, position daisy flowers and loopy bows on open area of wreath. Tuck leaves under flowers as desired. Hot glue in place.
- For hanger, determine top of wreath. On back, measure and mark about 1” down from top. Use craft knife to make 1/4″ long, shallow horizontal slit. (Carefully insert knife blade into slit, angled up toward top and remove.) Slightly separate curved end of paper clip 1/4″. Insert shorter rounded end up into slit, creating hanger loop with longer end of paper clip. (Hot glue if loose.)





 Subscribe


