
Supplies
- FloraCraft® CraftFōM®:
- 3" Cone - White
- 6" Cone - White
- FloraCraft® Smooth Finish®
- Jute Twine
- ¼ Yard Each Fabric:
- Yellow
- Orange
- White
- Yarn:
- Yellow
- Orange
- White
- Acrylic Paint:
- Yellow
- Orange
- White
- Buttons:
- Yellow
- Orange
- White
Tools
- Foam Cutter
- Low-Temp Glue Gun
- Scissors
- Spatula or Putty Knife
- Wooden Skewer
- Fine Grit Sandpaper
Instructions
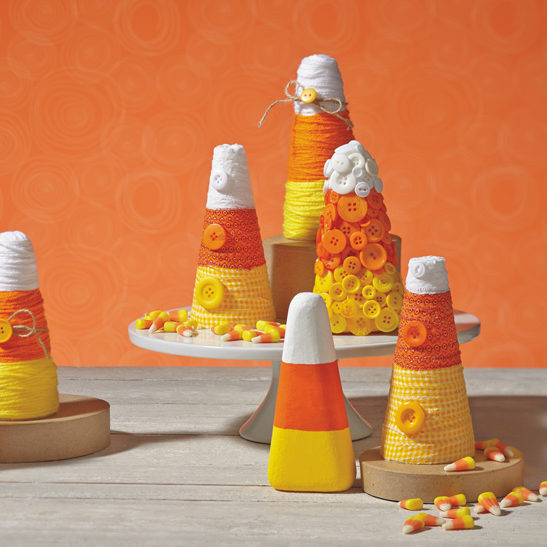
Smooth Candy Corns
- Cut the front and back of each of the cones flat with the Foam Cutter. The cones should measure about 1 ¾” thick at the bottom. Use the scrap pieces of foam as sanding blocks to even the edges and give the candy corn a rounded shape.
- Apply an even coat of Smooth Finish® to the cones using the spatula and let dry. Lightly sand the cones with fine-grit sandpaper and apply a second coat if needed. Let dry and sand smooth again.
- Divide the cones into thirds painting the bottom sections yellow, the centers orange, and the tops white. Let dry.
Fabric-Covered Candy Corn
- Tear long ½” strips of yellow, orange, and white fabric.
- Wrap the yellow strips around the bottom section of the cones, gluing the ends to secure them as you go. Glue the orange fabric strips to the center of the cones and the white strips of fabric to the top of the cones.
- Embellish the candy corns with buttons using low-temp glue.
Yarn-Wrapped Candy Corn
- Wrap yellow yarn around the bottom section of the cones to cover it completely. Secure the ends with glue. Wrap orange yarn around the center of the cones, gluing the ends to secure—Wrap white yarn to cover the top of the cones. You may have to glue the yarn at the top of the cone to cover it.
- Tie a jute bow around each cone and glue a button to the center to embellish.
Button-Covered Candy Corn
- Cut the front and back of the cone flat with the foam cutter to create the candy corn shape. The cone should measure about 1 ¾” thick at the bottom.
- Divide the cone into thirds and paint the bottom section yellow, the center orange, and the top white. Let dry.
- Glue yellow buttons to the bottom of the cone, slightly overlapping. Glue orange buttons to cover the center section and glue white buttons to the top section.
-
 Celebratory Candy CakeSkill level: Beginner
 -
 Teacher Gift MugSkill level: Beginner
 -
 Bubbling Pumpkin CauldronSkill level: Beginner
 -
 Custom Charcuterie DisplaySkill level: Beginner
 -
 St. Patrick’s Day DecorSkill level: Beginner
 -
 Butterfly Pixel Wall ArtSkill level: Beginner
 -
 Fruit Appetizer TreesSkill level: Beginner
 -
 Easter Egg Table DécorSkill level: Beginner
 -
 Shamrock Porch DécorSkill level: Beginner
 -
 Eyeballs Everywhere WreathSkill level: Beginner
 -
 Narwhal Wall ArtSkill level: Beginner
 -
 Painted Cactus Wall ArtSkill level: Beginner
 Subscribe


