
Supplies
- FloraCraft® CraftFōM®:
- FloraCraft® Diorama Kit
- Raffia - Natural
- Acrylic Paint:
- Red
- Tan
- (20) Toothpicks or Loose Straw
- 12" x 12" Cardstock Sheets:
- Red
- White
- Paint Marker - White
- Plastic animals:
- 5 1/2" Cow
- 3 1/2" White Sheep
- 5 1/2" Brown Horse
- 2" Pink Pig
- 2" Duck
- 2" Babe Chick Set
- 1.5" Black Spider
- 5.5" Doll
Tools
- Tacky Glue
- Scissors
- Ruler
- Small Rubber Band
- Mechanical Pencil
- Paintbrush
- Transparent Tape
- (2) Straight Pins
- Glue Gun and Glue Sticks
- Old Newspapers
Instructions
- (Optional: To create a “barn board” look inside Diorama, horizontal or vertical grooves can be made. Hold side panels up against back panels to see that they will run vertically – sides will overlap the top and bottom of the Diorama. Then decide which way you want the grooves to run inside the back and side panels.)
- Place back and both side panels of Diorama on the work surface. Use pencil and ruler to mark and draw vertical or horizontal lines 1/2″ apart. Then go back over the lines pressing with a pencil (with lead retracted) to make grooves.
- Turn over grooved panels (grooved side down). On a newspaper-covered work surface, paint all pieces and edges of Diorama sheets red. Let dry. Turn over pieces and paint tan. Let dry.
- Refer to package instructions to assemble Diorama using tacky glue and toothpicks.
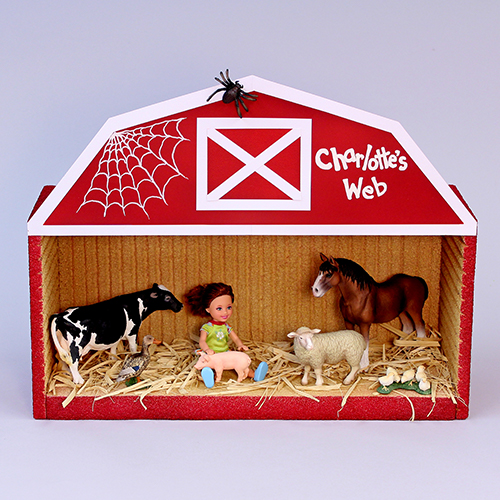
- For the roof, trace half-pattern twice on white cardstock and cut it out. Place roof pieces side by side and use transparent tape on the back to tape them together. Similarly, trace, cut, and tape two red roof pieces—position by centering red on white roof pieces and use tacky glue to spot glue together.
- For the barn door, measure and use scissors to cut a 3 1/2″ x 4″ white rectangle; two 3/8″ x 4 1/2″ white strips; and a 2 1/2″ x 3 1/4″ red rectangle. Position and white glue strips in “X” on the red rectangle and trim excess strips. Center mount and glue red on white rectangles. Position and glue the door to the roof.
- Referring to the photo, use a paint marker to draw a spider web and write the book’s name on the roof. Let dry.
- To attach the roof, squeeze a line of tacky glue along the top front edge of Diorama and position the roof. Use straight pins to hold in place until the glue dries. Then remove pins.
- For barn straw, grasp a bunch of raffia and diagonally cut all at once into 2″ lengths. Scatter straw on the floor of Diorama.
- Use a rubber band to gather the doll’s hair into a ponytail to represent the book’s character—position animals and doll in Diorama. Ask an adult to use a glue gun to glue a spider to the roof.
Click on the pattern to enlarge.
-
 Celebratory Candy CakeSkill level: Beginner
 -
 Teacher Gift MugSkill level: Beginner
 -
 Bubbling Pumpkin CauldronSkill level: Beginner
 -
 Custom Charcuterie DisplaySkill level: Beginner
 -
 St. Patrick’s Day DecorSkill level: Beginner
 -
 Butterfly Pixel Wall ArtSkill level: Beginner
 -
 Fruit Appetizer TreesSkill level: Beginner
 -
 Easter Egg Table DécorSkill level: Beginner
 -
 Shamrock Porch DécorSkill level: Beginner
 -
 Eyeballs Everywhere WreathSkill level: Beginner
 -
 Narwhal Wall ArtSkill level: Beginner
 -
 Painted Cactus Wall ArtSkill level: Beginner
 Subscribe


