
Supplies
- FloraCraft® Foam:
- 6" Cone - White
- Balls:
- (2) 2” - White
- 2.5” - White
- 3” - White
- 4” - White
- Cubes:
- (2) 3”x3” - White
- 5”x5” - White
- FloraCraft® Smooth Finish™
- Acrylic Paint:
- Orange
- Black
- Purple
- White
- Cheesecloth
- Wiggle Eyes
- Felt:
- Black
- White
- 5" Felt Top Hat - Black
- 5" Felt Witch Hat - Black
- Assorted Sizes/Styles Ribbon - Coordinating Colors
- (6) 3/8” Wooden Dowels
- Glitter:
- Purple
- Orange
- Beading Wire - Black
- Chenille Stems - White
- Straight Pins
- White Craft Glue
- Small Party Favor Bag
Tools
- Low-Temp Glue Gun
- Glue Stick
- Foam Cutter or Serrated Knife
- Wire Cutters
- Flat Paint Brushes
- Scissors
- Black Marker
- Fine Sandpaper
Instructions
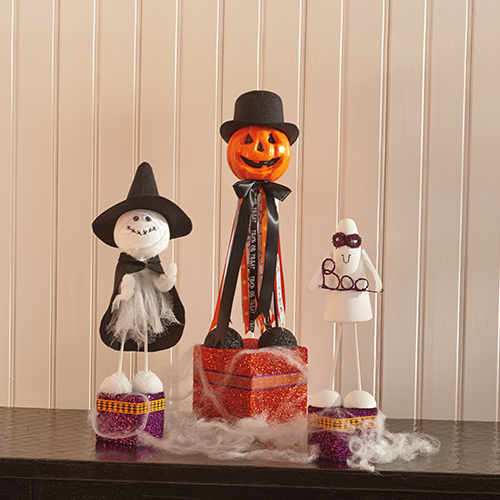
Pumpkin
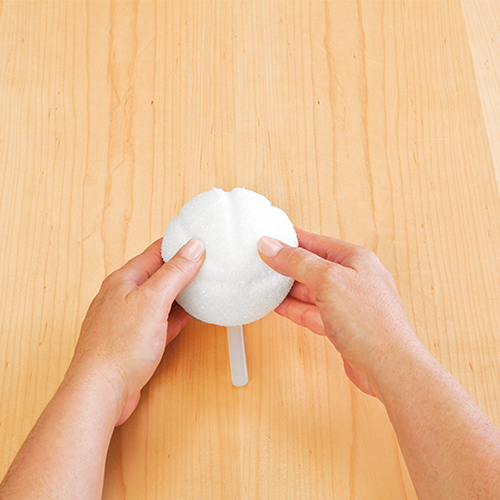
- Use the foam cutter or serrated knife to cut a small flat spot off the 4” ball. This is the bottom of the pumpkin. Lay a glue stick on the table and lay the ball centered on the glue stick with the flat spot away from you. Starting from the bottom, roll the ball towards you pressing down with even pressure keeping it centered on the glue stick. Continue to create eight grooves around the pumpkin evenly spaced.
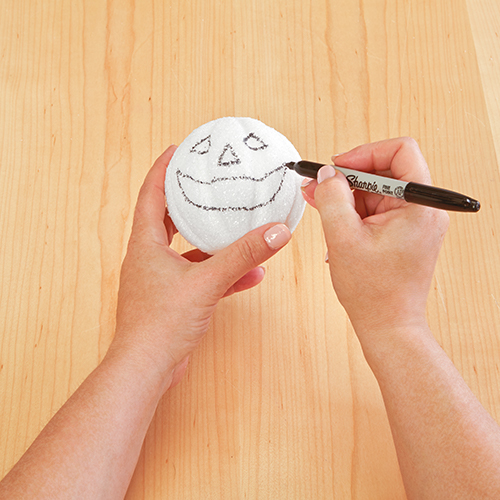
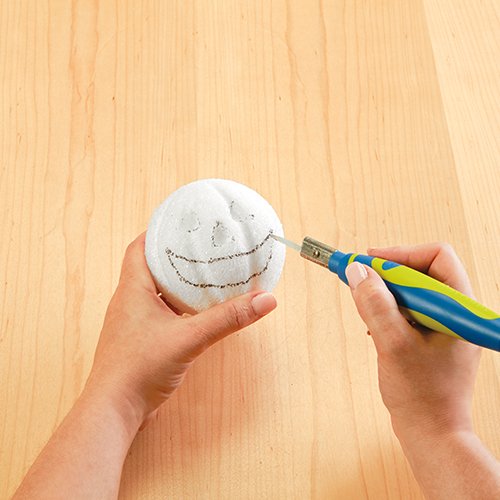
- Draw the face onto the pumpkin with a black marker. Use the foam cutter’s small precision blade or a small knife to follow the outline of the black marker pattern. Cut in about 3/8” deep then carefully scrape out the face sections using the end of one of the wood dowels.
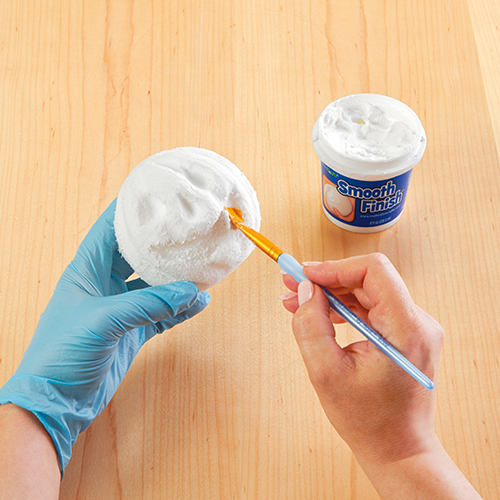
- Stir the Smooth Finish™ and read the instructions carefully before use. Apply a generous amount to a flat brush. Apply the finish to the ball smoothing it out as you go to fill the cells of the foam. Apply finish to completely cover the pumpkin and let dry. Use sandpaper to smooth any rough areas.
- Paint the 5” cube orange on the top and sides. While the paint is still wet sprinkle with orange glitter. The paint will secure the glitter in place as it dries. Paint the pumpkin orange and let dry. Paint the face sections black and let dry.
- Cut the 2.5” ball in half. Paint the two half balls black and let dry.
- Cut two 11” long wood dowels using the wire cutters. Paint them black and let dry.
- Glue the feet to the top of the cube at opposite corners as shown. Glue the black dowels angled into the tops of the feet with the dowel ends touching at the top. Glue the ends of the dowels into the bottom center of the pumpkin to secure in place.
- Cut lengths of coordinating ribbon and pin them under the pumpkin around the dowels as shown. Tie a black bow with long tails around the neck of the pumpkin. Pin the top hat on the pumpkin.
- Glue lengths of ribbon around the cube to embellish.
Mummy Witch
- Paint the top and sides of a 3” cube purple. While the paint is still wet sprinkle with purple glitter and set aside to dry. Cut two 9” long pieces of dowel with the wire cutters. Paint them white and let dry.
- Cut 1” strips of cheesecloth. Completely cover the 3” ball with cheesecloth strips gluing as needed to secure in place.
- Cut (12) ½” lengths of black wire and bend each piece into a “U” shape. Insert the wires crisscrossed into the face for the smile as shown. Glue two wiggle eyes above the mouth.
- Cut a 1.5” ball in half. Glue the two half ball (feet) to the top of the cube at opposite corners as shown. Glue the white dowels angled into the top of the feet with the tops of the dowels touching. Cut a small opening in the cheesecloth at the bottom of the head and glue the dowels into the head to secure in place.
- Cut lengths of cheesecloth and pin them to the bottom of the head around the dowels to create the body. Twist the center of a white chenille stem around the neck and bend the ends of the stem out for the arms. Wrap lengths of cheesecloth around the stems to cover the arms and glue in place. Glue lengths of cheesecloth to cover the tops of the feet.
- Cut a 7” x 7” piece of black felt. Round the two bottom corners with scissors to create the bottom edge of the cape. Fold a collar in the top of the cape and glue it in place around the neck. Pin the witch’s hat to the head.
- Glue lengths of ribbon around the cube to embellish.
Masked Ghost
- Paint the top and sides of a 3” cube purple. While the paint is still wet sprinkle with purple glitter and set aside to dry. Cut two 5.5” long pieces of dowel with wire cutters. Paint them white and let dry.
- Press and roll the top of the cone on the table to create a smooth rounded top. Press and roll the bottom of the cone edge lightly on the table to smooth the edge slightly.
- Apply an even coating of the Smooth Finish™ with the flat brush to completely cover the cone and fill the cells of the foam. Let dry. Sand smooth with sandpaper. Cut the 1.5” ball in half and completely coat the half ball (feet) with Smooth Finish™ and let dry. Sand the feet smooth. Paint the ghost and the feet white and let dry.
- Glue the feet to the top of the cube at opposite corners as shown. Glue the dowels angled into the tops of the feet so that the tops of the dowels touch. Glue the dowels into the bottom of the cone to secure in place.
- Cut two pieces of white felt 2 ¾” long x 1” wide. Trim to round one of the 1” ends one each piece with the scissors for the hands. Glue the corners of the opposite 1” end together and pin an arm to each side of the ghost.
- Cut out a small mask from the black felt. Brush the mask with glue and sprinkle with purple glitter. Let dry. Glue the mask to the ghost. Use the black marker to draw in the mouth and the eyes.
- Bend a piece of wire into the word “Boo”, brush with glue and sprinkle with purple glitter. Let dry. Attach the ends of the wire to the hands of the ghost. Hang a small party favor bag to the arm of the ghost.
- Glue lengths of ribbon around the cube to embellish.
-
 Celebratory Candy CakeSkill level: Beginner
 -
 Teacher Gift MugSkill level: Beginner
 -
 Bubbling Pumpkin CauldronSkill level: Beginner
 -
 Custom Charcuterie DisplaySkill level: Beginner
 -
 St. Patrick’s Day DecorSkill level: Beginner
 -
 Butterfly Pixel Wall ArtSkill level: Beginner
 -
 Fruit Appetizer TreesSkill level: Beginner
 -
 Easter Egg Table DécorSkill level: Beginner
 -
 Shamrock Porch DécorSkill level: Beginner
 -
 Eyeballs Everywhere WreathSkill level: Beginner
 -
 Narwhal Wall ArtSkill level: Beginner
 -
 Painted Cactus Wall ArtSkill level: Beginner
 Subscribe


